Quantcast
Channel: Developer Express Global
Viewing all 3388 articles
Browse latest View live

Blog Post: Web Dashboards - Neutral Filter Mode - Feedback Wanted!

$
0
0

Data filtering is one of the most-used interactive features of our Dashboard suite. We have recently taken some time to analyze the current implementation as well as user interaction patterns for the functionality. We observed two common behaviors:

  1. Our filtering widgets show all items selected by default, to indicate that no filtering is currently taking place: everything is included. Starting from this state, users typically begin each filtering operation by deselecting All, before they select individual items.
  2. Many scenarios require filtering by more than one criteria, and in this case multiple filtering widgets are usually used sequentially. For instance, a user might first filter by a Category, then by a Product, then perhaps by a time-related criteria or similar.

Room for improvement

On the basis of this understanding of common scenarios, we found that there are three technical issues with the current implementation. The first one is obvious: an extra click is required to begin any actual filtering operation, because the standard representation of the everything included state shows all items selected. You might call this a usability problem rather than a technical one, but we made the technical choice of presenting everything included this way in the first place!

The second issue is invisible but potentially important: internally, an everything included state still generates filtering criteria that are evaluated by the data layer and/or the database. This is not an optimal implementation for performance reasons.

The third problem is that there is a potential “dead lock” situation for the user, due to the fact that multiple filtering widgets influence each other. See the steps illustrated in the image below:

  1. The user deselects the year 1998 in filtering widget 1. The month/year combo items in filtering widget 2 are filtered down to exclude that year.
  2. Filtering widget 2 is used to select some individual month/year combo items for 1996 and 1997. Filtering widget 1 is filtered down to show only these two years.
  3. At this point it becomes impossible to bring 1998 back up for inclusion, because both widgets have criteria applied that exclude 1998.

Filtering deadlock

Neutral Filter Mode

To solve all the above problems, we have create a new filter mode called Neutral Filter Mode. It is neutral in the sense that it does not apply any criteria to the data source in its everything included state. This solves the second technical issue explained above, resulting in improved performance.

In the new mode, filtering widgets display the everything included state by showing all items deselected. This means that an extra click is no longer required in the most common scenarios, and this behavior is familiar to end users from websites world-wide. At the same time we have slight concerns about this change, since it requires user behavior to change as well.

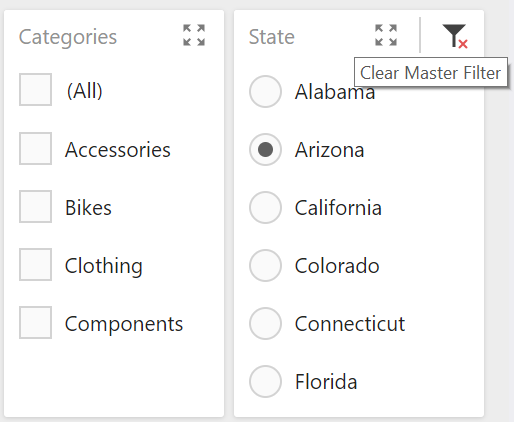
Finally, the “dead lock” situation described above can be resolved with the help of a new Clear Filter button. Compare Step 3 of this illustration to the one above:

Neutral Filter Mode

Give it a try!

In our minor release v18.1.5, the Neutral Filter Mode is available as a CTP feature for Web dashboards. We intend to support it for WinForms and WPF dashboards soon, and the feature will be fully released with v18.2.

To activate the mode, use the client-side property dashboardControl._useNeutralFilterMode:

<%@ Page Language="C#" AutoEventWireup="true" MasterPageFile="~/Main.Master" CodeBehind="Default.aspx.cs" Inherits="DXWebApplication1.Default" %><%@ Register Assembly="DevExpress.Dashboard.v18.1.Web.WebForms, Version=18.1.5.0, Culture=neutral, PublicKeyToken=b88d1754d700e49a" Namespace="DevExpress.DashboardWeb" TagPrefix="dx"%><asp:Content ID="Content1" ContentPlaceHolderID="MainContent" runat="server"><script type="text/javascript">
    function onBeforeRender(sender) {
      var control = sender.GetDashboardControl();
      control._useNeutralFilterMode = true;
    }</script><dx:ASPxDashboard ID="ASPxDashboard1" runat="server" Width="100%" Height="100%" OnDataLoading="DataLoading"><ClientSideEvents BeforeRender="onBeforeRender" /></dx:ASPxDashboard></asp:Content>

A demo of the new mode is available here: Neutral Filter Mode

Your feedback is appreciated

We hope you will share any thoughts with us! The new filter mode changes the user experience, and its internal implementation is also quite different from the old mode due to the way filtering criteria are applied. We want to use the time until the v18.2 release to finalize this feature, or revise it if necessary. We appreciate any thoughts you post to the comments section below, but it would also help us if you could answer the question in this short survey:


Blog Post: WinForms issue with Windows 10, version 1803

$
0
0

One of our customers has reported to us a issue with our WinForms controls, one that is related to a GDI resource leak. In their case, it caused an application crash – their system has a limit on how many GDI objects can be allocated.

Upon investigation by the team it turns out that the leak is related to Windows 10 version 1803 (also known as the Windows 10 April 2018 Update), or later.

We devised a really simple test to reproduce the issue:

private void button1_Click(object sender, EventArgs e) {
  for(int x = 0; x < 100; x++) {
    using(var f = new Form() { ShowInTaskbar = false }) {
      f.Show();
    }
  }
}

This particular nasty piece of code – I don’t advise you use it in production! – will “leak” 300 GDI objects, since each form created with ShowInTaskbar = false will leak 3 GDI objects. It’s a very common scenario to have such an option turned on (all popups, tooltips, menus, drag-n-drops, alerts, etc. are examples of such forms), and if the application has a relatively complex UI and is run continuously, sooner or later it will crash or freeze.

We have already devised a workaround for this issue. Needless to say, some rigorous testing is currently being done to make sure we don’t break anything else. We shall be updating our WinForms components from v17.1 or later to include it.

We are contacting Microsoft to see if they aware of the issue, and trying to determine if they have any timeframe for a proper fix.

Blog Post: WinForms Tips & Tricks - What You May Have Missed (Part 3)

$
0
0

Today we have another post for the Tips&Tricks series - useful features you may have missed. Here are links to the previous parts:

Direct Access to Online Help

A warm-up hint to get us started, not related to any specific control or feature: in Visual Studio, lots of DevExpress elements provide direct access to F1 help. Select a visual element in the designer and hit F1 and you’ll see the related documentation page come up in a browser window. The same thing works in code, too! With your editing cursor on a type name or an API call, F1 will bring up the correct documentation as well. This is the easiest way of getting help when you need it!

Sort Animations in the Data Grid

Here’s a small feature that instantly applies an elegant appearance to your Data Grid: enable the OptionsBehavior.AllowSortAnimation property and some smooth animation effects will accompany the sorting process when a user clicks a header. The most noticeable effect is that for progress bars in grid cells:

Sort Animations in the Data Grid

Note that these animation effects are disabled if you apply conditional formatting rules or you activate master-detail levels.

Data Annotation Attributes

Some DevExpress controls have support for .NET standard Data Annotation Attributes. As usual, such attributes should be treated with care - keep in mind that it is hardly a good idea from an architectural point of view to specify visual aspects of data display on a low-level ORM type! However, especially with MVVM-ViewModel types in mind you can save a lot of time by marking up properties and relying on control features to interpret the attributes.

For example, the Data Layout control organizes its items in groups and tabs according to attributes:

Data Layout Control with Data Annotations

The Data Grid can set column orders, hints, formats and validation rules based on annotations:

Data Grid with Data Annotations

Filtering UI Context

The FilteringUIContext component can generate an editor setup to filter data for an attached DevExpress data-aware control. Several controls are supported, please see the documentation page for a list. The data sources can even use Server Modes where supported and the FilteringUIContext integrates its criteria correctly!

Filtering UI

The generated filtering UI depends on a data model, which is retrieved directly from the control in simple cases. For more advanced scenarios, special models can be supplied. For each data field the component provides multiple editor options depending on the field type. For instance, numeric values are filtered using two text boxes and a track bar by default, but you can easily change a setting to use two SpinEdit editors instead.

Rename Layout Control Items

When you add controls to the Layout Control, it automatically wraps them into layout items with auto-generated names: layoutControlItem1, layoutControlItem2, etc. If you are using your controls from code, you may have assigned meaningful names to the controls and the automatic naming of the related layout items is not useful. You can invoke the Smart Tag menu on the Layout Control and click Rename Items to change the names to something more meaningful.

Rename Layout Control Items

The dialog Rename Layout Items uses the naming pattern lci<Control Name> by default (lci stands for layout control item), but you can replace this prefix with your own and optionally add a suffix.

Any thoughts?

As always, we look forward to hearing back from you! What’s your favorite feature from this list?

Blog Post: ASP.NET Core Reporting - CLI Templates

$
0
0

Way back in April 2018, we announced .NET Core support for our excellent Reporting suite. I ended that blog post with our future intentions:

Our long-term vision is to provide a completely consistent set of features regardless of the platform you choose for reporting. Therefore, we're going to constantly improve the .NET Core support in the context of the next release cycle. -Blog

I'm happy to announce a set of command line interface (CLI) templates to create DevExpress Reports for the .NET Core platform!

Quick Refresher

The .NET Core CLI allows you to create new projects directly from the console.

We're introducing a set of CLI templates that you can use to create starter cross-platform projects with DevExpress Reporting suite.

This means that you can create .NET Core projects with DevExpress Reporting on your MacOS, Linux, or Windows consoles!

1. Use the Console

Use the .NET Core CLI to create an ASP.NET Core Reporting application from the console.

Get started by installing the DevExpress CLI templates. Open the console and type the following command to install DevExpress CLI templates:

dotnet new -i "DevExpress.DotNet.Web.ProjectTemplates"

The console displays the list of templates installed on your machine after the installation command is finished.

2. Get Your NuGet Key

.NET Core projects rely on NuGet packages and you'll need access to the DevExpress NuGet packages. We offer a Nuget portal for our customers.

We're providing a personal NuGet URL for every registered DevExpress customer login. So if you haven't generated your personal URL yet then click on the 'Obtain Your NuGet Feed URL' button on the DevExpress NuGet portal.

This URL includes your personal feed authorization key and is used to install NuGet packages that the Document Viewer requires.

Please take a look at this blog post for more context.

3. Create New Project

Use the command below to create a new project with the Document Viewer. Pass the the NuGet Feed URL obtained above as a parameter.

dotnet new dx.reporting --nuget-feed https://nuget.devexpress.com/{YourDevExpressNugetKey}/api --name DocumentViewerApp --add-designer false

Replace {YourDevExpressNugetKey} with your personal NuGet key you obtain from step two.

DevExpress Reporting templates provide the following parameters:

  • -nf | --nuget-feed (required) - Specifies your personal DevExpress NuGet Feed URL.
  • -ad | --add-designer - Specifies whether to create a web page with the Report Designer that enables your end-users to create and customize reports. The default value is true.
  • -av | --add-viewer - Specifies whether to create a web page with the Document Viewer that allows you to preview, print, and export reports. The default value is true.
  • -ads | --add-data-source - Specifies whether to add a sample database file to a project and register the corresponding connection string in the application configuration file. The default value is false.
  • -ul | --use-logger - Specifies whether to log server-side errors and events related to the Document Viewer functionality to a specific file. The default value is false.

4. Download Other Resources

Run the commands below to navigate to the created application's folder and download all the necessary client resources.

cd DocumentViewerApp
bower install
TIP

If Bower is not installed on your machine then please follow the instructions here: Bower: A package manager for the web.

5. Restore Dependencies

Use the following commands to restore dependencies, build the application and get the application URL:

dotnet restore
dotnet run

6. View in Browser

Open your browser and insert the generated URL to see the result:

With a few steps, you've created a cross-platform .NET Core project with DevExpress Reports!

Feedback

We'd love to hear your feedback about the .NET Core support from DevExpress Reporting Suite. Please leave a comment below, thanks.


Email: mharry@devexpress.com

Twitter: @mehulharry

Blog Post: XAF - Enhanced Office Module, Updated Learning Materials and More (v18.1.5)

$
0
0

Great news! XAF’s most recent maintenance release (v18.1.5) includes new features and updated learning materials (and of course, a few bug fixes).

New features

WinForms UI: Office Module performance enhancements

In our MainDemo app, detail forms with a RichTextPropertyEditor will now load in 0.6 sec in v18.1.5 as opposed to 2.3 sec in v18.1.4. Kudos to our WinForms team - they optimized the way in which menus are generated based on feedback they received from us.  Non-XAF forms and controls with complex menu structures will benefit as well. For the best performance, build your application assemblies under x86 and process them with NGEN as recommended in the following articles: A2670 | T1489 | WinForms Tips & Tricks - Boosting Application Performance.

As you may already know, our WinForms HTML Property Editor Module is now in maintenance mode. We recommend that you use our RichTextPropertyEditor instead of HtmlPropertyEditor for standard usage scenarios (for instance, when you wish to create email templates).

ASP.NET UI: IFRAME support 

You can now embed an XAF ASP.NET WebForms app into IFRAME. This new feature will help integrate CRUD and other common XAF functionality within non-XAF Web portals. For more information, review the following support article: Q443184.

ASP.NET UI: ASPxGridLookupPropertyEditor is out of CTP

Main functions are ready and both internal and public preview tests did not reveal any show stoppers. We do not expect breaking changes either. We recommend that you use this new editor for reference properties instead of ASPxLookupPropertyEditor.

Mobile UI: Enhanced masked input

Mobile numeric, text and date editors now support formatting and thus help users avoid input errors. The familiar EditMask and DisplayFormat attributes are now used instead of the deprecated attributes with the "Mobile" suffix. You should not notice any problems, though - thanks to our IModelXmlConverter mechanism. For more information, review the following support article: T459804

Updated documentation

IObjectSpace.CreateObjectSpace(Type) is better than IObjectSpace.CreateObjectSpace() 

A best practice is to use the CreateObjectSpace(Type) method overload when your application registers multiple Object Space Providers (for instance, when it uses non-persistent objects (NonPersistentObjectSpaceProvider) and/or connects to numerous databases). This recommendation helps avoid situations wherein XPObjectSpace unexpectedly appears instead of NonPersistentObjectSpace and vice versa. 

Module Designer vs Application Designer

Settings for required modules (e.g., ReportsModuleV2.ReportDataType) are not editable in XAF's Module Designer.  The latter simply registers required module types without instantiation. To modify these settings, use the Application Designer.

New Troubleshooting Guide 

Recently, several XAFers accidentally disabled a very important Visual Studio extension (DevExpress.ExpressApp.Design.CorePackage). As a result, they lost the Model Editor's functionality - XAFML files opened as plain text. 
The new Designers Troubleshooting Guide helps isolate this and other common problems with our designers and Visual Studio itself.

The following highly rated help topics will also be of use when troubleshooting issues:


Interesting Support Center tickets

  • Three long-time customers shared their general XAF experience and XPO performance best practices (T653665);
  • One of our customers shared his custom Windows PowerShell command (cmdlet) and scripts. His cmdlet uses XAF's Object Space and facilitates long-running administrative tasks (Q476407).
  • Bing may unexpectedly translate texts with special characters, e.g. edit masks or display formats. Please be careful when you accept suggested translations in the DevExpress Localization Service (T643572).
  • We described how to calculate running totals for ListView columns using a custom criteria function and PersistentAliasAttribute (T658623);
  • We demonstrated how to customize Mobile UI appearance using custom CSS and the MobileWindowTemplate’s RegisterClientScriptXXX methods (T657883).
  • We discussed how to control the visibility of dynamically generated custom fields in Views (T654705).

Find more interesting customer questions and product enhancements for your favorite products in the DevExpress Support Center (expand the "Frameworks (XAF & XPO)" group on the right) and What's New documentation (see resolved issues). 

We need your feedback!

What do you think about these new features and the new "Interesting Support Center tickets" rubric in particular? Drop us a line below, thanks.

Blog Post: Simplifying our ASP.NET Control Suites

$
0
0

Writing for the web these days is very different from that a few years ago. The same goes for our control suites for ASP.NET: over the past decade we've evolved our original WebForms subscription in many different directions, and currently have five different suites, each different from each other, each providing slightly different capabilities:

  • DevExpress ASP.NET Classic WebForms Controls
  • DevExpress ASP.NET Classic MVC Controls
  • DevExtreme MVC Controls (for ASP.NET MVC and ASP.NET Core)
  • DevExpress ASP.NET Bootstrap for WebForms
  • DevExpress ASP.NET Bootstrap for ASP.NET Core

Of course, these choices don't even factor in the other parts of our DevExtreme product that cater to the pure client-side development community.

In essence, it has become more and more complicated and difficult for us to recommend a particular web control suite for new and existing customers. It is past time to simplify things.

We've taken a good long look at what we have, what is being installed and developed with out there, what feedback we have received from customers, and what would make the most sense to change. As a result we have come to the decision to retire the DevExpress ASP.NET Bootstrap for ASP.NET Core suite.

Rationale for the decision

So why simplify? The first reason: less confusion.

In providing two major libraries for use with ASP.NET Core, it was confusing for you, our customers, which library was the best choice. And similarly, confusing for us to make a recommendation. (The main difference between the two products boils down to the DevExtreme MVC controls providing client-side rendering and the DevExpress ASP.NET Bootstrap controls being server-side. As it happens, client-side rendering works extremely well with the ASP.NET Core framework.)

We therefore decided that we will focus on what we believe is the one best solution for ASP.NET Core: DevExtreme MVC Controls for ASP.NET Core.

Second, and more boring perhaps, is the resources problem. Simple and obvious enough to state: by maintaining one product instead of two means that we'll free up development and support resources so that we can introduce new features more quickly and with more impact to you, our customers.

Third, and perhaps more contentious, is that we believe the DevExtreme MVC Controls provide a much better alternative than the Bootstrap suite. For example, the DevExtreme MVC Controls work both with ASP.NET Core and ASP.NET MVC. They leverage modern web approaches by using client-side rendering (JavaScript) and supporting REST API. By having separate data services (Web API), it allows for:

  • Decreased maintenance costs
  • Improved scalability
  • Decoupled server and client (each can be modified independently)
  • Use of the same data API from mobile apps (native or hybrid)
  • Future-proof (client can be replaced with some new modern technology without rewriting the server-side)
  • Improved performance and user experience

This allows the DevExtreme MVC Controls to work better with the new ASP.NET Core framework than do the DevExpress ASP.NET Bootstrap for ASP.NET Core controls. And, of course, the DevExtreme MVC Controls also include support for Bootstrap themes.

Time for maintenance mode

In conclusion, from this point forward, we are placing the DevExpress ASP.NET Bootstrap controls for ASP.NET Core into maintenance mode. Maintenance mode means that the code will continue to work as is, the documentation and demos will stay online, the product is still supported, we will fix bugs when we (or our customers) find them, however, we will not be introducing any new features. Additionally, we have removed the option to purchase or renew the product.

In short, if you're using these controls today, then by all means continue to do so. We do not, however, recommend starting any new projects with this suite, and would ask that you consider switching to our other controls for ASP.NET Core: DevExtreme MVC Controls.

Migration?

The two suites are different enough that unfortunately a direct migration is not possible. If you are already using the Bootstrap-capable controls, here's what I recommend:

  • Just continue using them; after all, even in maintenance mode, they are still supported. Just be aware that you will not get any new features.
  • Start using the DevExtreme MVC controls in your projects (you can use both types of controls in one project), and slowly replace the Bootstrap controls you've used with the DevExtreme MVC controls.
  • For new projects, just use the DevExtreme MVC controls

Future Plans

We'll continue to grow these existing DevExpress ASP.NET offerings:

  1. DevExtreme MVC Controls (for ASP.NET MVC and ASP.NET Core) - This is a robust library that works great for both ASP.NET MVC and ASP.NET Core. If you want to use ASP.NET Core then use DevExtreme MVC Controls.

  2. DevExpress ASP.NET Boostrap for WebForms - Currently, we only offer 35+ controls for Bootstrap (WebForms). We plan to increase this number and bring over the major office controls too (Spreadsheet and RichEdit). In general, if you use our classic controls ASP.NET WebForms then you should consider using the DevExpress ASP.NET Bootstrap controls for ASP.NET WebForms instead.

  3. DevExpress ASP.NET Classic WebForms Controls - This amazing library of controls offers over 100+ controls and several great features.

  4. DevExpress ASP.NET Classic MVC Controls - The ASP.NET MVC version of our Classic WebForms Controls, this library is another popular choice for developers. Learn more about our MVC controls offerings here.

Feedback

We'd like hear your feedback about this topic:

  1. Have you used DevExtreme MVC Controls with the ASP.NET Core framework yet?
  2. What prevents your from using DevExtreme MVC Controls?
  3. What controls and/or features are you missing from DevExtreme MVC Controls?

Thanks.


Email: mharry@devexpress.com

Twitter: @mehulharry

Blog Post: Building the Ultimate Developer’s Walking Desk

$
0
0

Sitting for long periods of time can be deadly, whereas walking is healthy. If you’re obsessed with efficiency like I am, it makes sense to exercise while you work. I built my first walking desk three years ago, and recently after a move I had the opportunity to take on the challenge again. This time I decided to document my process, and I share it here in the hopes that some may find it helpful.

Constraints for Success

  • Transition from walking to sitting effortlessly - in less than five seconds.
  • Support multiple monitors.
  • Everything onboard the desk securely in place.
  • Support my dev laptop (with the ability to disconnect or reconnect my laptop in less than a minute).
  • Absolute minimum of cords connecting the desk to the outside world.
  • Easy to modify later.
  • Have expansion room leftover for custom peripherals (more monitors, streaming equipment, etc.)
  • Everything clean and neat, both above and under the desk.
  • Costs no more than $2000 to create and build.
  • Needs to follow guidelines from the Science of Great UI design course.

Parts

Here’s what you need:

  • Treadmill.

    Treadmill
    I’m using the LifeSpan TR1200-DT3 Under Desk Treadmill, retailing at $1149.99. This is the same treadmill I’ve had since 2015.

    My mini review: 3outta5stars It’s okay. When I’m walking, it totally meets all expectations, however I was never able to successfully get its Bluetooth connection working, and after being turned on for a long time, the control panel that sits on the desk will sometimes lock up and needs a reboot. But it’s three years old and still performs the essence of what it’s designed to do well and it’s low to the ground (more on why this is important later) so I’m still using it. When I’m in market for a new treadmill, I will likely consider alternatives as well as newer models and read product reviews.

  • Treadmill Desk.
    TreadmillDesk
    I’m using the TrekDesk Treadmill Desk, currently available for $649.99 on Amazon. When I originally bought this two years ago it was only $499, so the price appears to have definitely gone up without any apparent changes to the model.

    My mini review: 5outta5starsIt’s really good. Aside from the unexplained price increase since 2015, this treadmill desk is perfect for what we want to build. I’m tall (6’4” or 1.93m), and this desk has no problems reaching the height I need when standing on the treadmill to make typing comfortable. The desk is lightweight, sturdy, and is easy to work with. It also gives me that wrap around desk I prefer, perfect for a multiple monitor setup. The desk also has a number of holes around the edges which are perfect for feeding cords through (more on this later).

  • Drafting Chair.
    DraftingChair

    I’m using the Modway Veer Drafting Stool-Chair, currently available for $118.75 on Amazon. A drafting chair is critical for the under-five-second transition between walking and sitting, because the chair must be high enough so your elbows rest at the exact same height as they would be when walking on the treadmill. A drafting chair is part of that equation (more on this below).

    My mini review: 4outta5starsThis chair is functional at a low price. After a year’s worth of use the fabric on the arms has become rough.  Aside from that it continues to work well.

  • Furniture Sliders.

    FurnitureSliders
    I’m using the Shepherd Hardware 9220 1-1/8-Inch Chair Tip Slide Glide Furniture Sliders, 4-Pack, currently available for $5.60 on Amazon. These are a super important part of the equation. Because your walking desk will likely be supporting a lot of weight (e.g., multiple monitors), reducing friction where the desk meets the floor is critical.

    My mini review: 5outta5stars These sliders work really well, making it easy to slide the desk across the floor. I have tried these on both hardwood (last location) and tiled floors (new location), and they work really well on both surfaces. They last a long time (I replaced my originals after over two years of use), and they perfectly fit the legs of the TrekDesk Treadmill Desk. Great value for the money here.

  • Adhesive-backed Hook and Loop Tape.

    CommandStrips

    I’m using Command Picture Hanging Strips shown above, because they hold well and remove cleanly. So I can keep devices in place on the desk where they belong and later if I want to remove or change devices, I don’t have gunky adhesive all over the desk and/or parts I’m removing.  

    My mini review: 5outta5stars These hanging strips are great for keeping items on your desk in place when sliding back and forth. And I love that the adhesive detaches without leaving any residue on any of our onboard equipment.

  • Picture Hanging Wire
    PictureHangingWire
          
  • Cable Ties.

    CableTies

    For my build I used a package of 50 150mmx3.5mm black cable ties, and ended up using all 50 of those ties.

Other parts that may vary with your implementation: Extension cord, power strips, screws, wood glue, monitor stands, etc.

Equipment

  • Drill
  • Saw (ideally one that easily cuts straight lines at right angles)
  • Screw driver
  • Needle nose plyers
  • Cutters (to cut the wire and the cable ties)
  • Sandpaper

The Platform

The key to a fast walking/sitting transition is to bring your forearms (when sitting) to the same height as they are when walking on the treadmill. This is why treadmill height off the ground is important. The LifeSpan treadmill I’m using is 6” or 15.25cm off the ground. Pretty low, so that’s good. Satisfying this constraint is also why we’re using a drafting chair instead of a normal office chair. The Modway Veer drafting chair brings the seat up to 29” or 76.33cm off the ground. But a flat treadmill and a tall drafting chair are not enough to solve this problem alone. We will also need to build a platform to make up the difference.

The platform height plus the drafting chair’s armrest height (when the chair is at its highest position off the ground) should equal your forearm height when walking. In other words, we’re going to create something like this:

SittingStanding2
Click image above for a larger version. The desk slides backwards so you can sit, or forwards so you can walk.

By getting these forearm heights equal, you can quickly and almost effortlessly change from walking to sitting and back.

In my original build of the platform (from three years ago), I cobbled-together a messusing a picture frame, duct tape, Styrofoam, and cardboard (these last two supplies were borrowed from the original desk’s shipping box). The picture frame’s borders effectively prevented the chair wheels from rolling off the platform. And while arguably shoddy, this platform worked well and held together for almost three years until we moved.

However, for my latest build I decided an upgrade was in order, so I built the platform out of wood. The wooden platform feels more solid than my old Styrofoam/duct tape and cardboard solution (I suppose no surprise there).

Here’s what my platform looks like:

WoodenPlatform

I used wood that was about 1 5/8” or 4cm on two sides (cut to various lengths) for the structure and border rails, a sturdy plywood for the floor, and about 32 long wood screws. Note the use of diagonals on each of the four sides. Building this was a great lesson in mechanical engineering for my kids. Before the diagonals the cube was wobbly, and after the diagonals it was so solid I felt I could start tossing it around the room (we didn’t). When I built this with the kids the hardware stores were all closed, and we were running low on wood screws, so instead of using two at each connection point (as I really felt we should) we only used one. But once we got the diagonals cut properly and in place, it became clear that each screw was more than capable of holding its respective connection in place.

Here’s the step-by-step on how I built it:

First, I set my chair down onto the plywood, turned the wheels inward, and measured the minimum space I needed, adding a border all around. The width of the border matched the width of my wood (1 5/8” or 4cm).

I cut four pieces of wood to serve as that border (to keep the chair from sliding off the top of the platform). Those pieces are screwed together like this:

ChairBorder

The plywood is the floor to the platform, and is cut to line up with the outside edge of this border, and attached to the border with eight screws (two on each border edge):

PlatformFloor

The image above is the floor and border flipped upside down. The properly-oriented assembled platform floor with borders looks like this:

ChairBorderAssembled

Next, we need to build the platform. This consists of a matching top and bottom pieces, supporting columns, and diagonals. We’ll start with the top piece.

The top rectangle should be at least as big as the opening in the floor, because it needs to support the weight of the chair that sits right above it. We can use two of the same-length pieces we’ve already used before (shown in purple, both above and below), with new pieces (in green) to make it long enough to just fit inside the bordered floor.

TopUnit

As a test, your completed top unit should fit snugly (or be a bit too big to fit) inside the bordered floor:

TopUnitFitsInsideBorders

Careful: The image above is only to show comparative sizes of the floor and the top rectangle of the platform. This top rectangle will not be positioned as shown above.

Next, let’s build a bottom rectangle, which looks exactly like the top:

BuildBottomUnit

Next, add the side columns to the top rectangle:

AddColumns

Tip: This is a good time to get some help. When I built this part, I had two kids helping keep the columns upright as I screwed down each one.

After attaching the columns, you’ll need to flip this assembly over, and you’ll want to do this carefully because at this point the structure is fragile.

Add the remaining rectangle:

AssemblingTopAndBottom

Next, we’ll need to add diagonals on each of the four sides shown above.

Carefully turn the crate on its side and rest it on a piece of wood long enough to become a diagonal, like this:

MarkDiagonalWithPencil

Arrange the diagonal so the center of the wood touches the inside corner on each side. Mark the two inside corners with a pencil…

MarkedDiagonal

then remove the platform and cut:

AndCut

Make sure the diagonal is a snug fit. Cut/trim again if necessary to get this right. Install the snugly-fitting diagonal with (at least) two screws as shown below:

AddDiagonal

Repeat for the other three sides, and you get a structure that looks like this.

AllDiagonalsAdded

Notice in my implementation above each neighboring diagonal starts on the opposite top/bottom side. I’m not a mechanical engineer, but this felt like it would result in a more stable structure than one where two diagonals both meet at the same corner:

DiagonalsStartAtOppositeSides

The last step is to add the floor on top of our platform, and you can do that with four (or more) screws like this (make sure it’s centered over the platform before you drive the screws):

AttachFloor

The lengths for all the pieces I used are shown below (in imperial units):

AllPieces

Lengths for the diagonal pieces are not shown as those are custom-cut to fit snugly in each of the four sides.

Remember, your lengths will likely be different based on your forearm height when walking on the treadmill and the minimum base size needed for your drafting chair.

And of course, feel free to splurge and buy an extra pack of wood screws so you can increase the screw count if needed.

Here’s another view of the platform:

ChairAndPlatform

Suggestion: When building this platform, I actually made it about an inch (2.54cm) taller than I needed, in case the drafting chair’s lift mechanism were to fail in the future, where it becomes unable to reach its full height. Having it be a little taller than needed may buy time to continue working while I replace the dying chair.

Afterthought: After building this and using it a few times, I’m now thinking I should create a standing area on the side, and I might rebuild this as a future project. My older platform was wide enough and had plenty of room for my feet as I mounted/dismounted the chair. But because my new platform tightly holds the wheels of the chair (see pic below), I have less space to place my foot as I’m getting seated:

PlatformTightFit
In this design I have little room to stand as I’m getting into or out of the chair.

A standing space on the side of this new platform would make getting up and down easier. I could extend the platform so I have more room to stand next to the chair, but still keep the tight lock on my chair wheels. I imagine something like this:

PlatformV2

Power

The most important feature when building the ultimate programmer’s walking desk is onboard power. When I built my first desk I had only one power strip, and later felt the pain of that limitation when I wanted to add more devices.

My new desk has three power strips, with outlets to support up to 16 onboard devices:

DeskUndersidePowerPanorama

I’m not worried about driving three different power strips from a single outlet because the total wattage of everything on my desk remains relatively low, with my laptop and monitors taking up most of the load.

The power cord leading to the desk should ideally never touch the floor. In my original setup the power cord leading to the desk did drag across the floor, and while I almost never had a problem of cord colliding with sliding desk legs, it was frequently a concern and I’d often find myself carefully watching the cord as the legs slid by or pushed it out of the way. In the new improved desk the cord is attached to the wall at a midway point, and as a result never touches the floor as I slide the desk between its extreme positions.

OnBoardPowerCord

Monitors

Because we’ll be sliding our desk back/forth as we transition between walking and sitting, it is very important that all monitors be securely fastened to the desk. This is especially true of monitor stands that may be supporting vertically stacked monitors.

I used picture hanging wire because it is strong and easy to bend. Here’s how I secured a VIVO two-monitor stand in the center of my desk:

MonitorTiedDownSideView

Notice I twisted two lengths of wire together for redundancy. I want this to be secure for a long time and be resilient to sudden forces applied to the desk in different directions.

Here’s that same stand from the back:

MonitorTiedDownBack

Notice also I’m drilling holes in the desk and feeding the wire through those holes. Here’s a second monitor stand:

IMG_2943

Beneath the desk I twist the wires…

StartingToTwist

cut the excess wire…

CutTheWire

and bend the sharp pointy edge up toward the desk…

TurningUp 

TurningUp2

And the final result looks something like this:

TwistedAndFlat

Tip: when placing monitors, try to distribute the weight between all four legs of the desk. In my initial placement, my heaviest onboard items were almost directly over the two furthest legs and as a result those two furniture sliders where working much harder than sliders closer to me, and there was some audible noise when sliding quickly. Get the balance right before you tie the monitors down, especially if you're placing heavy monitors near the back of the desk. Suggestion: have a friend hold the monitors in place while you push the desk back and forth over the surface to test weight distribution and balance.

Keyboard & Mouse

I use a Microsoft Natural Keyboard 4000. The keys are angled out so my arms are in a more comfortable position. The TrekDesk Treadmill Desk is a wrap-around desk, which I love for monitor placement but on this desk my keyboard needs to be positioned a bit further away from me than I would like. So I built a small extension for it out of thin plywood and sanded down the leading edges. Here’s the extension placed on the desk and secured with picture-hanging wire:

KeyboardPlatformWithDottedLine

The dashed line shows the actual edge of the TrekDesk below the extension.

Here’s the mouse and keyboard in position:

KeyboardInPosition

Onboard Equipment

Every onboard item that has a dedicated position is kept in place using the removable hook & loop tape:

HookAndLoop

Cabling

So one of my goals is to have the smallest amount of visible cable above the desk. That means the bulk of the wiring needs to happen under the desk, and that we bring cables up to the surface only when needed (and bring those cables up through holes that are closest to where they are needed).

I mentioned before that the TrekDesk had holes around the perimeter of the desk that made it easy to bring wires from the underside to the top of the desk. These pics should give you an idea of just how big they are:

CablesComingThrough1  
The capacitor in the line is easily pushed through.

CablesComingThrough2
Even the female end of a power cord easily slides right through.

WirelessChargerComingThrough
Even my wireless phone charger slips through!

The TrekDesk has ten of these perfectly-shaped holes distributed around the perimeter of the desk. You can also optionally use any of these as a mounting point for one or more of their cupholders:

Cupholder

The only challenge I had fitting cables through these holes was when I tried to get an XLR audio cable through. XLR connectors seem just a bit too big for the hole and at first it seems like you can’t get them through. However, after a few tries I discovered they can in fact be pushed through safely (no damage to the desk or the cables) if you slowly apply consistent and sufficient force.

Below the desk, wiring needs to be cleanly routed and cable-tied. This is what it looks like under my desk now:

UnderTheDesk

It’s pretty good. Maybe not perfect, but cables are definitely out of the way yet still easy to change.

Here’s the cord that brings power to the desk:

PowerCordIn

Final Layout

Here are a few pics of the in-progress layout of the developer's walking desk, version 2.0:

DeskWelcome
Pictured above:
my laptop, three external monitors, Stream Deck, Zoom H6, headset mic, wireless phone charger, USB ports, treadmill control panel, speakers, keyboard, mouse and a CodeMash drink coaster all resting on my treadmill desk.


The desk nearly all the way back (sitting position). I pull it back until the keyboard meets my fingertips in a comfortable position.

45DegreeView
The desk in walking position. To get it here I just start the treadmill, hop off the chair and push the desk forward slowly until it’s where I want it.

SideView
Side view of seated position.

GreenScreen
View from the front, seated position, reveals my live streaming setup (greenscreen plus lighting).

Conclusions

Let’s see how we did in meeting our criteria for success:

  • The desk supports up to four external monitors. Check.
  • Everything onboard the desk is secure and where it belongs. Check.
  • I can connect/disconnect my developer laptop in about 45 secondsCheck.
  • Above-surface cords and wiring is clean; below-deck cords are cable-tied and out of the way. Check.
  • There’s still room for one more monitor and more equipment. And modifications and later expansion are both reasonably easy (cut some cable ties, drill a few holes, route cables, wire equipment down, plug into power, tie cables).
  • Total cost of treadmill + desk + chair + wood + screws + cable ties + velcro: $1,984.33, so we came at our budget.

The desk is easy to use and easy to transition between walking and sitting. And regardless of whether I’m walking or sitting, my forearms are the same distance from the keyboard - a position where the smallest physical effort is needed to write code. so we followed most of the applicable good-design guidelines from the Science of Great UI (although I’m still thinking about extending the platform, literally widening the path so I have more room to stand before sitting down).

Overall I’m pleased with the desk, and I’m excited to be able to simultaneously write code and get my exercise (did I mention I’m obsessed with efficiency)? So it’s time to get back to work.

By the way, if you would like to see me write code live from this desk, check out my live streaming channel, CodeRushed, on Twitch.

Let me know what you think (and if you have any questions/suggestions)!

Blog Post: Save the Date for .NET Conf 2018!

$
0
0

.NET Conf 2018 - Save the Date

Hey Everyone! Amanda here...

.NET Conf 2018 is less than a month away, and DevExpress is sponsoring this year's event! .NET Conf is a FREE, 3 day virtual developer event co-organized by the .NET community and Microsoft. And it's happening September 12-14!

Over the course of the three days you'll have a wide selection of live sessions streaming that feature speakers from the community and .NET product teams. It's a chance to learn, ask questions live, and get inspired for your next software project.

You'll learn to build for the web, mobile, desktop, games, services, libraries and more for a variety of platforms and devices all with .NET. They'll have sessions for everyone, no matter if you are just beginning or are a seasoned engineer. And you'll see presentations on .NET Core and ASP.NET Core, C#,F#, Azure, Visual Studio, and much more.

Plus, DevExpress will air the conference live on our website, so you can watch it right here! I'll post another blog with that link when we're closer to the event.

Save the date today.

Cheers! Amanda


Blog Post: WinForms - Ribbon Performance Improvements

$
0
0

As you may have heard before, at DevExpress we allocate some resources in each release timeframe to find and eliminate performance issues in existing controls and components. After v18.1 came out, we started focusing on the Ribbon Control and the results of this work are included in v18.1.5.

A starting point for performance improvements was provided by the XAF team. They described some scenarios to us where real-world applications that use the XAF Office Module take quite a while to load. There was a suspicion that the behavior was due to a heavily populated Ribbon. Armed with a profiling tool, we started digging into sample applications to investigate in detail, and we identified a number of weak spots where certain calculations were performed more than once, objects created and then dropped, or similar.

None of the issues we found were very serious individually, but we reckoned that improvements would still amount to reasonable performance gains cumulatively. Since the Ribbon is a core component of many applications, we made the effort and managed to improve low-level performance by 13%. To measure the gains, we started the RibbonSimplePad demo 50 times, and its average initialization time dropped from 2080 to 1810 milliseconds (that’s without NGen precompilation).

RibbonSimplePad Startup

After the initial success on the Ribbon level we moved on to the mechanisms implemented in many of our Office controls, which generate Ribbon configurations. These implementations are part of the Rich Edit, Scheduler, Spreadsheet, PDF and Dashboard suites, and also the XAF Office Module. We made several improvements in this area, including these:

  • Icons retrieved from the Image gallery are cached
  • Initialization processes are improved for the Color and Font editors, using asynchronous loading and other techniques
  • SvgParser internals have been fine-tuned to avoid reflection
  • Ribbon item creation algorithms have been reworked for control commands like CreateAppointment, OpenDocument, etc

The benefits for real-world applications are impressive! The XAF Office Module represents much of what a “real-world” application does, and the time it takes to initialize and show itself has been reduced by up to 70%:

XAF Office Module Improvements

In addition to the XAF Office Module tests, we also conducted a series of artificial test where we measured the time it takes a form with an Office control and its associated Ribbon to show up. We used benchmarking applications precompiled with NGen, and we measured both design-time and runtime generated Ribbons for the Dashboard suite (the other control suites don’t have a standard generation mechanism working at runtime). Here are the results in milliseconds:


v18.1.4v18.1.5Gain
Dashboard (Ribbon generated at runtime)333365280%
Dashboard (Ribbon generated at design-time)82556032%
Spreadsheet(Ribbon generated at design-time)140098030%
Scheduler (Ribbon generated at design-time)52646711%

If you would like to reproduce the results, you can use our benchmark project on GitHub as a starting point.

As always, we are interested in your thoughts! It is our expectation that most WinForms applications will benefit from performance improvements like those we achieved here. Please let us know your findings!

Blog Post: XPO - Interview with the Team

$
0
0

Many times, customers have asked us how we use XPO – or if we even do it at all. We decided to sit down with developers working on and with XPO and conduct an interview, with the goal of answering the most common questions. The result makes for an interesting read since it addresses many historical, strategical and technical aspects. Enjoy! 

When was the XPO Object/Relational Mapper released? Is it mature? 

XPO, the DevExpress ORM library for .NET, is a mature product that was first released in 2003. For around 15 years, XPO has been bundled with all our commercial product subscriptions. With the v18.1 release in May 2018, we made XPO available free of charge for everyone to use, as a strong alternative to Entity Framework Core. If you’re not familiar with XPO, you can learn more about its main feature set from the landing page. For a full list of XPO functionality, please visit our online documentation site, search our large support database or contact support. 

What platforms and technologies does XPO support?  

XPO helps access and manipulate data stored in-memory or within RDBMS database engines running on Windows, MacOS or Linux, in desktop, web and mobile projects powered by .NET. All .NET project types are supported by XPO, from the console to various ASP.NET flavors and UWP.  New .NET Standard-based technologies like Blazor will likely be supported in the future as well. We have also recently ported XPO from .NET to the VCL platform for Delphi and C++Builder apps. 

How actively does DevExpress use XPO internally? 

At DevExpress, we use XPO for nearly all our services: online documentation, the Support Center, our CRM, and the main website. You may not believe it, but even with the large number of version control options available to us (like GitHub, GitLab, and HG), XPO remains at the core of our internal version control system (DXVCS)! We still use our homegrown system because to date, no existing VCS has been able to handle the complexity of our product line/projects.  

In addition, XPO is at the core of several public DevExpress products. Our Business Application Framework XAF has used XPO for UI and database scaffolding since 2007. The XPO security engine is heavily used by the XAF security moduleDashboard and Reporting UI component libraries for various platforms use XPO APIs for database access (for instance,  in SqlDataSource and CachedReportSource). 

In short, we use XPO everywhere - from small to large mission critical apps. Oh, and our high-load systems work with databases ranging in size from 40 to 100 gigabytes.

Our Support Center:


Our internal version control system (DXVCS):
 

Are XPO team devs involved in internal product development? 

Yes, we are always involved – we want to see XPO succeed for our internal services and public DevExpress products. Real-life XPO based solutions help us continually improve the product, and to understand how it fits into a modern development landscape. For internal solutions the XPO team assists other teams to use the ORM correctly and efficiently. Company-wide we save resources with this unified approach, which means we don’t have to reinvent data access-related functionality whenever we do something new. 

How large is your internal app data model? Do you visualize it to better understand all the relations? 

Our largest internal app currently has 188 persistent classes. XPO supports a visual designer, but we don’t use it much. Our approach mainly a top-down (code first) strategy, which XPO was designed for traditionally. However, we work with many customers who use the visual designer extensively to visually maintain data models, and the XPO wizard to generate data models for existing databases.  

What about databases? Do you use SQL Server? 

We have used XPO with many SQL Server databases in production for 15 years - countless DevExpress customers rely on SQL Server. XPO also supports many other database systems. We don’t use them in production, but we know from our work with customers that Oracle, PostgreSQL, Firebird and MySql are the top database engines where SQL Server is not an option. Some customers successfully maintain XPO-based solutions that allow switching of the database server technology in deployment. 
Most XPO releases contain improvements to the level of support for one or more database systems. Check out our recent update as an example: it includes support for new driver versions and database specific features. 

Do you have hints for high-load applications with XPO? 

Since many of our own services handle quite high loads, we have had opportunity to test and evaluate different approaches in detail. Here are the three most helpful XPO features for such scenarios:  

  • The ThreadSafeDataLayer prevents data corruption to the metadata storage in XPDictionary when XPO is used in multi-threading scenarios. Code examples: one, two, three
  • The Connection Pool dynamically creates and destroys database connections depending on the current application load. Code examples: one, two, three
  • Object and Data Layer Caching enables caching on two different levels, returning valid object data and complete query results where possible, without executing queries on the server or even making a server roundtrip (SqlDependency is also supported). Code examples: one, two, three.

Each of these architectural components is highly configurable and can be fine-tuned to reflect your requirements. 

Do you have performance metrics for materialization, create, update, delete and other operations? 

Good performance is critical for our own services and we have always used performance tests with XPO and competing products to support our choice of XPO as a strategic platform. Recently we have published reproducible results of a comparison with EF6 and EF Core at https://github.com/DevExpress/XpoNetCoreDemos/tree/master/ORMBenchmark. These tests are based on the popular https://github.com/dotnet/BenchmarkDotNet benchmarking framework. 

Are there any internal projects that use other ORMs? 

Yes, there are several services that use Entity Framework 6, but these are small and deal with light loads only. Our internal team attempted to use Entity Framework for our Support Center as part of a large refactoring effort in 2014. However, they found several severe issues that ultimately prevented a move in that direction.  

A serious issue was the SQL generation mechanism used by Entity Framework. As an example, here is a  LINQ-query against the Northwind database. Its structure is typical for the Support Center, with a couple of joins and a subquery:

var query = from o in context.Orders 
        join od in context.Order_Details on o.OrderID equals od.OrderID 
        join c in context.Customers on o.CustomerID equals c.CustomerID into g 
        where g.Count() > 0 
        select new { o.OrderID, o.OrderDate, od.Quantity, od.UnitPrice, Count = g.Count() }; 


This is the SQL code XPO generates for the query. It is close to a SQL query that might be written manually by a developer. 

select N0."OrderID",N0."OrderDate",N1."Quantity",N1."UnitPrice", 
    (select count(*) as Res0 from "dbo"."Customers" N2  
where (N0."CustomerID" = N2."CustomerID"))  
from ("dbo"."Orders" N0 
    inner join "dbo"."Order Details" N1 on (N0."OrderID" = N1."OrderID")) 
where ((select count(*) as Res0 from "dbo"."Customers" N3  
where (N0."CustomerID" = N3."CustomerID")) > 0) and N0."OrderID" is not null 

On the other hand, Entity Framework generates this SQL:  

SELECT 
[Project1].[OrderID] AS [OrderID],  
[Project1].[OrderDate] AS [OrderDate],  
[Project1].[Quantity] AS [Quantity],  
[Project1].[UnitPrice] AS [UnitPrice],  
(SELECT  
    COUNT(1) AS [A1] 
    FROM [dbo].[Customers] AS [Extent4] 
    WHERE [Project1].[CustomerID] = [Extent4].[CustomerID]) AS [C1] 
FROM ( SELECT  
    [Extent1].[OrderID] AS [OrderID],  
    [Extent1].[CustomerID] AS [CustomerID],  
    [Extent1].[OrderDate] AS [OrderDate],  
    [Extent2].[UnitPrice] AS [UnitPrice],  
    [Extent2].[Quantity] AS [Quantity],  
    (SELECT  
        COUNT(1) AS [A1] 
        FROM [dbo].[Customers] AS [Extent3] 
        WHERE [Extent1].[CustomerID] = [Extent3].[CustomerID]) AS [C1] 
    FROM  [dbo].[Orders] AS [Extent1] 
    INNER JOIN [dbo].[Order Details] AS [Extent2] ON [Extent1].[OrderID] = [Extent2].[OrderID] 
)  AS [Project1] 
WHERE [Project1].[C1] > 0

In this case, the queries generated by XPO and EF executed in roughly the same time, even though their execution plans are a bit different. However, we also encountered EF generated queries that ran very slowly. Trying to optimize them by changing the LINQ query was almost impossible, since the generated SQL differs so much from the LINQ starting point. In many cases, our optimization efforts resulted in even more complex queries, and we gave up after a couple of weeks. 

A second major issue was that the Support Center uses SQL Server Full-Text Search technology to enable ticket search for our support engineers and DevExpress customers.  

We found only one method to integrate Full-Text Search with EF, by replacing some placeholders in the resulting SQL (https://stackoverflow.com/a/19644900/592926). That approach seemed questionable to us. 

In contrast, XPO provides a number of flexible extension points: 

  • Custom Criteria Language operators based on database-specific functions (example);
  • Custom functions and criteria for LINQ to XPO expressions (example); 
  • Custom connection providers for databases (example);
  • Decorator classes for various XPO layer interfaces: IObjectLayer, IDataLayer, IDataStore (example). 

We enabled  SQL Server Full-Text Search for XPO by means of a simple custom function, which can be used in any CriteriaOperator or XPQuery:

public class FTSContainsFunction : ICustomFunctionOperatorFormattable,   ICustomFunctionOperatorQueryable { 
    public object Evaluate(params object[] operands) { 
        return true; 
    } 
    string ICustomFunctionOperator.Name { 
        get { return "FTSContains"; } 
    } 
    public Type ResultType(params Type[] operands) { 
        return typeof(bool); 
    } 
    public string Format(Type providerType, params string[] operands) { 
        return String.Format("contains({0}, {1})", operands[0], operands[1]); 
    } 
    public System.Reflection.MethodInfo GetMethodInfo() { 
        return typeof(XpoExtensions).GetMethod("FTSContains"); 
    } 
}

XPO has a .NET Core version, too. Will you use this in new projects? 

We are very excited that XPO can run in so many different environments now, including Linux, iOS, Android, and UWP - .NET Core 2.0 and Xamarin/Mono make it possible (we even published a sample using Blazor and XPO). 

We tried to port XPO to .NET Standard 1.1, but there were too many restrictions at the time and we decided not to release it. In November 2017, we made a fully functional version of XPO available for .NET Standard 2.0. Since then, we added several features that are important for .NET Core projects, like Dependency Injection support for ASP.NET Core, .NET Core/.NET Standard project support in our ORM Data Model Wizard and compatibility with ASP.NET Core applications for the XPO Profiler.  See also our roadmap plans here.

Our internal team has already created several small services that use XPO for .NET Standard 2.0. Our experiences have been positive and we assume that more internal services will run on the platform in the near future. 

At this time,  XPO for .NET Core / .NET Standard 2.0 officially supports SQL Server, MySql, PostgreSQL, FireBird, SQLite and Oracle for .NET Core. The lack of support for other providers is not a limitation of XPO - only a function of support from RDBMS vendors. Once these vendors support .NET Standard 2.0, we will test XPO against these backend providers and add them to our supported list once our internal qualification requirements have been met. 

All in all, XPO for .NET Core is ready for production. It is 99% the same as XPO for the full .NET Framework (the 1% are some #ifdef lines), so you shouldn’t be worried about its quality or future.

What makes XPO unique? Which features do you value most for internal development? 

Our internal team supplied an interesting use case example of a very unique XPO feature: runtime data model generation without supporting design-time classes (example). The implementation is used in all our audit services, and it doesn’t use a single design-time persistent class. Metadata is generated at runtime based on a schema supplied by the main service. The dynamically generated auditable classes differ from the originals by including an extra modification time column as part of a compound key.

The ability to work with runtime persistent types is very popular among XPO and XAF customers. For instance,  the open-source eXpand Framework, a set of extensions for XAF, provides a visual constructor for UI and database schema: http://www.expandframework.com/#worldcreator  

The extensibility model offered by XPO is valued highly by our internal development teams. For example, we created an extension to insert a hint into a query (OPTION clause) to prevent SQL Server from using a bad execution plan in a specific case. 

It is easy to analyze the XPO query tree via a custom implementation of the IQueryCriteriaVisitor interface, because the code can work with CriteriaOperator instances in the SelectStatement object on the IDataStore level, instead of dealing with plain SQL.  

We overrode the ProcessSelectData method in a descendant of MSSqlConnectionProvider: 

protected override SelectStatementResult ProcessSelectData(SelectStatement selects) { 
    foreach(CriteriaOperator criteria in CollectCriteria(selects)) { 
        if(BadFunctionsFinder.Find(criteria).Count > 0) { 
            if(!string.IsNullOrEmpty(sqlOption)) { 
                postfixForRequest = string.Format("option ({0})", sqlOption); 
            } 
            break; 
        } 
    } 
    try { 
        return base.ProcessSelectData(selects); 
    } finally { 
        postfixForRequest = null; 
    } 
} 

For testing purposes, we rely very much on our InMemoryDataStore. This makes it possible to test the largest part of a system without using a real database and without functional restrictions.  EF Core now has a similar feature, but Entity Framework 6 does not support this approach out of the box. 

Finally, it is fantastic how easily the XPO data access layer can be changed: just modify the connection string. You can also switch from a local to a remote data store supplied by a service (WCF and others) by specifying a remote service URL instead of a database connection string (more details here).

How to get started with XPO? 

There are two ways to obtain XPO assemblies for your app: use either the Unified Installer or Nuget. Nuget is quick and easy but does not come with Visual Studio design time support. If you'd like to install XPO via the Unified Installer, simply download our trial installation and install our products in "trial mode." XPO will be automatically installed without trial restrictions. If you own a DevExpress paid subscription, you can use your existing DevExpress credentials when prompted by the Unified Installer. 

The free version of XPO does not include technical support. You can search our online documentationsupport database (with many Knowledge Base articles and user tickets) and numerous Code Example topics for free. Learning materials for beginners are located at DevExpress ORM Tool > Getting Started. You may want to watch Complete Tour of DevExpress ORM: eXpress Persistent Objects (XPO) - this YouTube video is old, but the same concepts apply today. 

There are also online demos at https://github.com/DevExpress/XpoNetCoreDemos (Console, Xamarin and ASP.NET Core) and offline demos that come with the unified installer. For instance, check these demo folders for different platforms: 

    c:\Users\Public\Documents\DevExpress Demos 18.1\Components\WinForms\CS\XpoTutorials\
    c:\Users\Public\Documents\DevExpress Demos 18.1\Components\WinForms\DevExpress.VideoRent.Win\CS\
    c:\Users\Public\Documents\DevExpress Demos 18.1\Components\WinForms\CS\ContactManagement\
    c:\Users\Public\Documents\DevExpress Demos 18.1\Components\WinForms\CS\GridMainDemo\ 
    c:\Users\Public\Documents\DevExpress Demos 18.1\Components\WinForms\CS\SchedulerMainDemo\ 
    c:\Users\Public\Documents\DevExpress Demos 18.1\Components\ASP.NET\CS\ASPxGridViewDemos\
    c:\Users\Public\Documents\DevExpress Demos 18.1\Components\ASP.NET\CS\Bootstrap.AspNetCore\ 
    c:\Users\Public\Documents\DevExpress Demos 18.1\Components\ASP.NET\CS\ASPxSchedulerDemos\
    c:\Users\Public\Documents\DevExpress Demos 18.1\Components\WPF\DevExpress.VideoRent.Wpf\CS\
    c:\Users\Public\Documents\DevExpress Demos 18.1\Components\eXpressApp Framework\XVideoRental\
    c:\Users\Public\Documents\DevExpress Demos 18.1\Components\eXpressApp Framework\MainDemo\

You can also get community help on StackOverFlow. If you want to receive technical support from DevExpress, you can purchase the XPO - ORM Library Subscription for $399.99. Full terms of use can be found here. For more information on this free version, check out this blog post.

Higher tier subscriptions like Universal, DXperience, WinForms, WPF, ASP.NET, Reporting, DevExtreme also include XPO tech support. Just like almost every business app needs database access APIs/ORM, it also needs good looking and reliable components for its UI. So, buying a DevExpress UI component subscription may be justified beyond just technical support for XPO.  

Thanks again for your business. We look forward to working with you now and into the future.

The DevExpress XPO Team
www.devexpress.com/support
XpoTeam@devexpress.com


Love XPO and want to help us promote it? Add the package through Nuget.org instead of DevExpress Nuget!

Blog Post: WPF - Actor Model as a Model layer for MVVM

$
0
0

A little while ago, we received some very interesting feedback from one of our DevExpress MVPs, Mikhail Shubin, who had created an Actor-based implementation of a model layer with a WPF MVVM application. I have been interested in Actor models for a long time, so I thought this was pretty exciting. We decided to publish his demo as a knowledge base article, so others can benefit from it.

To give you some background, the Actor Model (follow the link for a detailed explanation on Wikipedia) is a pattern that helps create loosely coupled entities called Actors which execute concurrently and can be deployed in distributed systems. Actors use message passing to communicate, and actors as well as messages are very light-weight so that very large numbers of both can be handled by typical implementations. Actors usually form fault-tolerant logical systems where they are organized hierarchically, with parents being responsible for the supervision of their children. Erlang is a platform that became famous for its Actor Model support, and Scala also offers it as a standard API. For .NET there are several library based implementations and Mikhail chose Proto.Actor for his application.

Without further ado, here is the KB article that shows some technical examples and includes a demo application: KB Article T630656

Blog Post: DevExtreme Reactive - A Feature Update (v1.7)

$
0
0

It’s been a while since the last blog post about DevExtreme Reactive controls and it’s time to catch up with the latest developments! Our developers have been hard at work and we are now on version 1.7. Here’s a summary of new functionality.

Vue Grid

The Vue Grid has received lots of attention in an effort to work towards feature parity with the React Grid.

Advanced Filtering

The filtering feature set of the Vue Grid is now the same as that of the React Grid. You can find documentation and demos here.

Vue Grid Filtering

Banded Columns

Banded columns are fully supported now, including the ability to customize their appearance. They allow you to group columns in bands and provide group titles, making the structure of the grid easier to understand for the end-user. Here are documentation and demos.

Vue Grid Banded Columns

Virtual Scrolling

Row and column virtualization enable the grid to deal with large data structures efficiently. Instead of generating row and column objects in memory for all data elements at once, the grid uses placeholders for the larger part of the data that is not currently visible at any given point. Documentation and demos for this functionality are here.

Column Chooser

This UI element allows the end-user to select visible columns at runtime. Here are documentation and demos.

Vue Grid Column Chooser

Tree Data Mode

There is special support for hierarchical Tree Data in the Vue Grid now. The functionality is very flexible, so you can easily utilize any data structure you already have in your application.

In comparison to the React Grid, the hierarchical selection feature is currently missing.

Find documentation and demos for Tree Data in the Vue Grid here.

Vue Grid Tree Data Mode

React Grid Summaries

The React Grid now supports very flexible summaries. Default summaries can be calculated automatically for all rows as well as for grouped subsets using Tree Data or Grouping. You can implement custom summary algorithms or completely take over the calculation algorithm (for instance to offload the job to a server), and of course you can influence the display format of calculated values.

Full documentation and demos are here.

React Grid Summaries

React Chart Grouped and Stacked Series

Grouped and stacked series are now supported by the React Chart. These two features are implemented by the same plugin and a simple property defines whether a particular series is part of a stack. You can even customize order and offset parameters of the stack, and the documentation page shows an example of a Streamgraph to illustrate this.

Documentation and demos are here.

React Chart Stacked Series

Test It Today!

All the features described above are available now and you can try them yourself by installing the latest versions of the DevExtreme Reactive packages.

What do you think? If you’d like to share your thoughts, please feel free to leave a comment below or post questions or suggestions to our GitHub issues page.

Blog Post: DevExpress will be in Munich during .NET Conf 2018

$
0
0

On Wednesday, September 12th 2018 the .NET Conf2018 conference will kick off. This 3 day virtual conference is free for anybody who wants to attend.

If you’re a .NET developer and want to stay on top of things, this event will bring you up to date with everything you need to know. Whether it’s  web, desktop or mobile, there are sessions for everyone.

On the first day/evening, The München .NET Meetup has organized a watch party and DevExpress is sponsoring with pizza and drinks. John and I will be present in Munich and we will bring some T-Shirts and other goodies as well as one platform subscription of choice and two CodeRush subscriptions to give away!

If you’re from the Munich area, click here to sign up for this free party.

Hope to see you there!

Blog Post: Free DevExpress Bootstrap 4 Themes

$
0
0

We've created two beautiful new themes and, not only that, we've made them open source so you can download them for free! These themes were expressly created for websites that were built using Bootstrap v4 or later.

Check out the new themes:

DevExpress Purple

DevExpress OfficeWhite

We strive to create beautiful themes for our controls and these new Bootstrap themes are no exception.

The new DevExpress OfficeWhite and Purple Bootstrap themes are designed with the same clean aesthetic as our modern ASP.NET themes like 'Mulberry', and 'Moderno'. In fact, the OfficeWhite theme was inspired by our 'Office365' ASP.NET theme.

Demos: https://devexpress.github.io/bootstrap-themes/

GitHub

Download, or clone, the themes from the open source GitHub repository here:

https://github.com/DevExpress/bootstrap-themes

Open Source (MIT)

We're making these two new Bootstrap themes available under the MIT open source license. This license type allows you to:

  • Use the themes for free
  • Modify the themes too

It's rare but occasionally we'll provide some of our open source projects under the permissive MIT license.

So why are these new DevExpress Bootstrap themes available for free?

Spread the word

Since launching the DevExpress ASP.NET Bootstrap Controls for ASP.NET WebForms, we've been thinking about how to get the word out about these fantastic controls.

The Bootstrap framework is widely used and offers a rich ecosystem of themes. We want your help in spreading the word about the DevExpress ASP.NET Bootstrap controls.

So download the free themes, use them in your Bootstrap enabled websites, and then tell a friend.

Feedback

Which theme do you like better, DevExpress OfficeWhite or Purple? Drop me a line below, thanks.


Email: mharry@devexpress.com

Twitter: @mehulharry

Blog Post: DevExpress Dashboards - Tab Support for Windows & the Web

$
0
0

Here’s some great news: we are getting ready to release a highly requested feature - Tabs support within DevExpress Dashboards! As you might imagine, our implementation is based on user feedback and a number of unique usage scenarios.

This new feature will be supported across the following platforms:

  • WinForms, WPF
  • ASP.NET WebForms, MVC, Core
  • HTML5/JS Web Dashboard

Before we get into details of our implementation, here’s a word of caution. One of the main priorities of any dashboard is to display information in a simple format that is easily understood. It should be free of distraction and utilize visual mechanisms that allow a user to access relevant detail at a glance. For all those reasons, UI specialists warn against the use of structures that hide information, even temporarily. Tabs can obviously be understood as a means of hiding information in this context. We recommend to take great care when tab structures are defined, and to keep an eye on the aspects described above at all times!

With that out of the way, here’s what we came up with.

Sometimes it makes sense to create several dashboards that display related content. Typically, this content is not so closely linked that it should be combined in one dashboard, but it is beneficial to offer the information in (almost) the same place. Sometimes, dashboards can even be switched programatically, for example when entering or leaving a presentation mode.

To support these scenarios, it is now possible to use a Tab container in the root layout group.

Root Layout Page 1

Root Layout Page 2

Code API

It is possible to hide tab headers for the container and use the API from code to select the visible tab. This little WinForms code snippet can be used to switch tab pages on a timer event. We are frequently asked how a slideshow-style dashboard view can be implemented, for instance for status monitoring on dedicated screens. This can now be done quite easily!

// during initialization
tabContainer.ShowCaption = false;
...

private void Timer_Tick(object sender, EventArgs e) {
  int selectedIndex =
    dashboardViewer.GetSelectedTabPageIndex(tabContainerName);
  int pageCount = tabContainer.TabPages.Count;
  dashboardViewer.SetSelectedTabPage(tabContainerName,
    ++selectedIndex % pageCount);
}

Automatic Page Switching from Code

More Information Per Dashboard

Many customers have asked us for tab support because they would like to include more information in one dashboard layout. As long as all information needs to fit one screen, there are tight limits on the number of controls that can be shown at the same time without cluttering the UI. As mentioned above, we don’t recommend arbitrarily adding tab pages with additional information. However, we have identified several scenarios where tabs can be beneficial.

Shared Filter Elements

A very useful scenario is that of using common filter controls for multiple large elements in a dashboard. In the past, such a dashboard would easily appear quite crowded:

Shared Filter Elements without Tabs

Instead, it is now possible to share the filter controls across tabs, which results in a cleaner UI and more space for each data control:

Shared Filter Elements with Tabs Page 1

Shared Filter Elements with Tabs Page 2

Shared Filter Elements with Tabs Page 3

Of course, as an extension of this scenario, you could also consider decluttering your dashboard by using tab pages to split controls into groups without making shared filter elements available.

Display Variations

Tabs make it easy to show the same data in multiple different ways, leaving it to the user to choose the control that helps them analyze and understand the data most effectively.

Display Variations

Filter Elements on a Tab

Another useful separation is to move filter elements to their own tab page. This maximizes space for data controls, but makes it a bit less convenient to change filter settings. As with the other suggestions for tab use cases, we recommend analyzing your users’ requirements carefully!

Filter Elements on a Tab Page 1

Filter Elements on a Tab Page 2

Display Item as Page

If you have another look at the illustrative image in the section Display Variations above, you’ll notice that there is a combination of title bars visible at the top. The caption of the tab sits above the caption of the content element on the page. We have implemented a feature called Display Item as Page that can combine these elements like this:

Display Item as Page

For this feature, we would like to hear your feedback. It is currently implemented only for WinForms, and we have encountered some technical difficulties with it, specifically to keep the behavior intuitive when a user modifies the layout at runtime and includes additional elements on the tab page. What do you think? Is this merging feature important? Do you expect to use tab pages with single items?

State of the Dashboard Tabs Feature

Tabs are implemented as a cross-platform layout feature. They require support in the platform-specific previewer components. At this point, we have implemented this support for all previewers, targeting WinForms, WPF, the various ASP.NET flavors and HTML5/JS.

As explained above, Display Item as Page is currently supported only by WinForms. Per-tab export is currently unsupported for the Web previewer, but it will be included in the final release.

Try it now!

If you are an active Universal subscriber and would like to test this feature prior to its official release, please email our support team at support@devexpress.com or create a private ticket in the Support Center. With that, we can verify your account and provide you with a v18.2 preview installation privately.

If you are using a trial and want to try this feature today, you can purchase a DevExpress Universal license online (this will give you access to early builds such as this CTP). If you own a non-Universal subscription and are ready to upgrade, email us at clientservices@devexpress.com for preferential upgrade pricing.

We are very interested in your thoughts! What do you think about tabs in dashboards? Do you have other scenarios in mind than those described above? Do you think we are missing something with our implementation?


Blog Post: XAF - Access v18.2 Features Today for Early Testing and BONUS for v18.1.6

$
0
0

Your feedback counts!

As part of our ongoing commitment to support the needs of our XAF customers, the upcoming v18.2 release will ship with several major features. Many of them are inspired directly by customer feedback!

If you are an active DevExpress Universal subscriber and would like to test these features prior to its official release, please leave a comment to this post or rather create a separate private ticket in the Support Center. With that, we can verify your account and provide you with a v18.2 preview installation privately.

If you are using a trial and want to use these features today, you can purchase a DevExpress Universal license online (this will give you access to early builds such as this CTP). If you own a non-Universal subscription and are ready to upgrade, email us at clientservices@devexpress.com for preferential upgrade pricing.

By providing early build access, we hope to find out whether our new features and solutions address your requirements and issues. Your testing efforts and your feedback help us deliver the best possible final implementation. We have described other benefits of this cooperation in this post.

In advance, thank you very much for your help!

WinForms UI: SVG Icons Support (UPDATE)

One of our primary objectives in 2018 is to improve the appearance of XAF desktop apps on high resolution displays. To achieve this, we will work to replace all default XAF PNG icons with their SVG equivalents (by the end of 2018). First however, we need to ensure that all XAF visual elements support SVG images themselves: menus and navigation elements, the DetailView layout groups and tabs, built-in property editors, form templates, etc.

To check our progress in this regard and to help future development by answering questions from our team, please read this knowledge base article.

Our UI designers have recently provided us with a large collection of SVG images. We’ve integrated them into XAF’s Model Editor, form templates (we also added our new skin selector), property editors, etc. Remaining tasks include: draw icons for various business objects, integrate the DevExpress WinForms Accordion control, update demos, and integrate all new and existing XAF images into the DevExpress.Images library.


ASP.NET UI: Split View layout support (MasterDetailMode = ListAndDetailView)

XAF’s ASP.NET WebForms UI includes will ship with a new community-inspired feature - ListViewAndDetailView display mode for ListView. Much like Microsoft Outlook’s “Compact View,” this feature allows you to display a DetailView for focused records within the ListView. To get started and to learn more about these capabilities, please read this knowledge base article.


BONUS: WinForms Office-inspired Word Processing Module is out of CTP in v18.1.6!

Main RichTextPropertyEditor functions are ready and both internal and public preview tests did not reveal any show stoppers. We do not expect breaking changes either. The last thing that kept us has been fixed in v18.1.5 (our WinForms team optimized the way in which menus are generated). As you may already know from our previous announces, the WinForms HTML Property Editor Module is now in maintenance mode. We recommend that you use our RichTextPropertyEditor instead of HtmlPropertyEditor for standard usage scenarios (for instance, when you wish to create email templates). We’ve updated the corresponding online documentation and Support Center articles, but missed the XAF Solution Wizard. Ignore the CTP label for the Office module there - we will remove it in v18.1.7+.

Updated documentation

Interesting Support Center tickets

  • With v18.2,  the design-time Model Editor tool works with Class Library projects using the new Visual Studio 2017 csproj format (T665236);
  • We discussed how to add validation rules dynamically (at runtime) so that required properties do not accept nulls, do not exceed length or meet other criteria (T162321);
  • The IObjectSpace.Rollback() method signature has been changed to IObjectSpace.Rollback(askConfirmation = true). This allows you to call the Rollback method with a false parameter and suppress rollback confirmation (T133109);
  • We discussed that non-persistent POCO marked with the DomainComponentAttribute do not support custom (runtime) members and that they are totally different from Domain Components (DC) despite using the same attribute (T666245);
  • An advanced scenario where a customer needed to dynamically localize his extenders for Application Model elements (T665740);
  • We discussed a separation of concerns and that the best programming practice is not to couple your data model with the UI (T665693);
  • Ways to specify an XAF Property Editor for properties and types individually or globally, statically or dynamically (KA18907);
  • We discussed how to manage DetailView field tab order dynamically, in code (T446884);
  • A couple of advanced validation scenarios with non-persistent objects in a persistent object's DetailView and the report wizard (T666584 | T666397);
  • A couple of scenarios that illustrate how to use the SplashScreenManager component to improve perceivedperformance of your chart and CRUD forms (T666543 | T563780);
  • A new KB Article inspired by recent user questions on whether to use XAF with an old frozen or unchangeable database schema and all the business logic in raw SQL, stored procedures (T671224).

Find more interesting customer questions and product enhancements for your favorite products in the DevExpress Support Center (expand the "Frameworks (XAF & XPO)" group on the right) and What's New documentation (see resolved issues). 

Other highly rated content

Blog Post: Holy Grail - Embedded Images Inside Source Code

$
0
0

DevExpress is proud to announce a killer new feature for Visual Studio developers using CodeRush: The ability to embed any image inside source code and effortlessly share that image with everyone on your team.

It's like getting a file format upgrade across all the languages you work with, adding the ability to include images with source code to make the code easier to read and bring new developers up to speed faster.

Embedded images are useful for:

  • Documenting code with pictures in places where words alone are insufficient.
  • Signposting important code for instant recognition.
  • Communicating with other devs on your team.
  • Placing formulas.
  • Placing temporary images (e.g., portions of the spec or screenshots of visual bugs to be fixed) in the code right next to the code that impacts them.
  • Branding (place author's image or company's logo in the code) with clickable links taking devs to your sites.
First we'll show you how easy it is to embed images inside your source code, and then we'll show you how it all works behind the scenes (and there is no proprietary tech anywhere).

How to Embed Images in Source Code

Two steps:
  1. Copy an image from any application or web browser.
  2. Paste it inside a comment in source code.
We know. Pretty simple. But for those who want a visual of these steps in slow motion, here they are again…
  1. Copy an image… from anywhere...


  2. Paste it inside a source code comment….

    You can use the right-click "Paste Image" context menu to paste as shown above, or you can simply press Ctrl+V or Shift+Insert to paste when the caret is inside a comment.
Just copy and paste, and voilà - images inside source code:

Interaction

Embedded images are first-class citizens in the Visual Studio editor and can be interacted with, just like embedded images in any other application such as Office or Google apps.
For example, you can...

Select an Image

Just by clicking on it. Simple.

Resize the Image

Just by dragging one of its sizing handles. Cool.

Crop the Image

Three steps here:
  1. Right-click and select Crop Image....

  2. Drag the crop handles as needed.

  3. Click outside the image (anywhere in the code) to apply your cropping.

Cut, Copy, or Paste Images plus Code

Just select the code and images normally (with the mouse or Shift+navigation keys), and then cut or copy, and paste the code + images into any source file in the solution.
Nothing special needed here. It just works.

Undo/Redo Changes to Images or the Code

Again, nothing special here. Just press your normal undo/redo keys (e.g., Ctrl+Z or Ctrl+Y), or invoke these actions through the normal Visual Studio undo/redo toolbar buttons.

Indent an Embedded Image

This is also super easy to do. Just add or remove spaces before the leading comment delimiter.

Hide Leading Comment Delimiters

Would you like to embed an image without the distraction of leading comment delimiters? You can do that just by adding a backtick (`) character immediately after the leading comment delimiter, like this:

Nice.

Place Text to the Left or Right of an Image

This is also easy. Just add text before or after the image markdown in the comment and it will appear on either side of the image when you move the caret away.

You can also paste an image while you're typing (in a comment) like this:

Well-defined Implementation

When building this tech, our constraints were tight. Sure, images in source files are really cool, but it was crucial that the new tech came without adversely impacting development in any way.
As a result, embedded images do not increase file size or compile times (more than a short comment would), and do not slow down editing, intellisense, debugging, or solution-open time.
Additionally, embedded images work with:
  • Version Control
  • Teams (everyone can see them)
  • Many supported languages (currently C#, JavaScript, Typescript, VB, F#, HTML, CSS, and XAML)
  • Clipboard (can be copied with surrounding code and pasted anywhere in the solution)
  • Visual Studio's Undo/Redo stack.
  • Code Snippets and CodeRush Templates (more on this below)
  • Difference Engines
  • Third Party Tools

Use Cases

We've identified six primary use cases for embedded comments, summarized and detailed below:
  1. Documenting Code that needs visual explanation such as a formula or graphic to better show what's going on and reduce the cost of getting new developers up to speed.
  2. Signposting to help devs more quickly recognize important sections of the code.
  3. Team Communication to let other team members know when code is awesome or needs work.
  4. Temporary Visual Notes in place, in the code, to help you fix bugs or implement the spec more quickly.
  5. Accessing Tools related to the code (with clickable buttons right where you want them).
  6. Branding/Linking to help users of your code see who you are and get to your site from the code in a single click.
Examples of each of these follow.

Documenting Code

You can easily mix images with with code to create a rich visual document that explains itself. For example, this JavaScript function calculates the intersection between a line and a plane. There are three possible outcomes of that intersection determination, but those three outcomes are not immediately clear looking at the code. Here's the code as you might normally see it:

And here's the same code with embedded images, showing each of the three possible line/plane intersections:

Here's another example in F#. This code calculates the distance between two points across the surface of a sphere, using halvesine's formula, but that isn't clear from the code at first (or second or third) glance:
We can explain this code, make this code easier to read, and get new developers up to speed faster with an embedded image comment showing the formula, like this:
We can also add a hyperlink from the image to the wikipedia article explaining the formula by right-clicking the image and choosing "Link…". Once a link is added, left-clicking the image will open the page in a separate browser window.
Speaking of formulas, you can easily create your own using LaTeX and an online formula renderer like this. For example, this LaTeX:
\frac{ax_0 + by_0 + cz_0 +d}{\sqrt{a^2 + b^2 + c^2}}
Generates the image for the formula in the C# code below:

Signposting

Signposting lets you put an easily recognizable image near an important section of the code. We can recognize images much faster than we can read text, so signposting may be useful in this context. For example in this JavaScript game developed for my twitch.tv/CodeRushed live coding channel, Rocket.js has an image at the top acting as a visual signpost, so I can easily recognize this important class as I'm moving through source files.
And here's my Thumbtack.js class in a balloon-popping game I built:
Not every class may be important enough or lend itself toward visual signposting, but it's nice to know it's there if you need it.

Team Communication

Sometimes a team member might contribute an outstanding piece of code that deserves recognition. For example, here are some hard-coded strings in an application that needs to be localized (e.g., translated into other languages), and an image that can call the entire team's attention to the concern:
Now we have a message the team is not going to miss
And you can instantly insert a commonly used graphic from a collection of existing team images without copying or pasting using Visual Studio's code snippets or CodeRush's templates. It's pretty cool stuff.

Temporary Visual Notes

My spec is partially in Excel, but I'm working in Visual Studio. I can switch back and forth between apps, but why not simply copy the Excel table and paste it in my code? It's easy with CodeRush.
Just select the part of the table you need, copy it…

And paste it into the source code:

Now the spreadsheet is inside the code, an easy reference as you add the new shortcut bindings. And once you're done adding shortcuts you can delete the comment.
Here's another example. In my game, I noticed the bottom-right rocket engine isn't quite lined up correctly. I can take a screenshot of my running application
Paste the screenshot into the code right next to the function responsible for the visual glitch…
Crop it (to emphasize the problem area)…
And even Pixel-Scale it to zoom in on the pixels and the problem...
And in seconds, I have an image from my running application inside my code that shows me exactly what I need to do. 
I can fix it now or save the issue for later. Either way, I have everything I need in one place for when the time is right to change this code.

Accessing Tools

You can add images with links that functionally serve as buttons right in the code to invoke Visual Studio commands such as "Project.Properties" or execute CodeRush commands like "CleanUpDocument", or open URLs.
Just right-click the embedded image, choose "Link…", and specify the URL to open or the command to invoke when the image is clicked.
Note: Images with links can be selected with the mouse if you right-click them. Their context menu will appear but can scale them if needed by dragging one of the image resize handles.

Branding/Linking

Want to drop your image or company logo in the code with a link to your webpage? It's easy to do with this technology. Just copy and paste your image into a comment. Then right-click and select "Link…", then add your URL.
For example, here's the DevExpress logo showing up at the top of some DevExpress source code. Clicking the link can take customers to the community site where they can connect with support, search our knowledge base articles, get code samples, and more.
Or if you're a speaker or trainer you could put your photograph in your sample source code to let everyone know who wrote this awesome code, and maybe add a link to your web page or Twitter page, for example.

How It Works

So, we promised at the beginning that we would take you behind the scenes to see how all of this magic works, and we also promised that you would find nothing proprietary. Here's the essence of the magic behind this, and you can expect more details in a white paper in the coming days.
  1. When you paste an image into a comment, we convert that to a file that's stored inside the solution folder (.cr\images). This is the folder to share (check in/out of version control) so your entire team can see the images.
  2. The image file name is a hash of the image itself. That means if you paste the same image more than once, you'll only get one image in the .cr\images folder.
  3. When we find an image in a comment, we adjust Visual Studio line height appropriately.
  4. When you crop or resize an image, we adjust the comment text appropriately (image on disk remains unchanged).
  5. When you pixel size an image to 200%, 400%, 800%, or 1600%, we scale the image using nearest neighbor (so the pixels are blocky and easy to see). For all other scaling options we scale to highest quality.

What If I Don't Have CodeRush?

If you don't have Visual Studio with CodeRush loaded, or you're using other editors like VS Code, alt-text is available in the image comment markdown, and the image file name is also in the comment and can be loaded from the .cr/images folder in stand-alone image viewers. It's not as easy/awesome, but the embedded images can still be referenced and seen by devs without this tech.

Areas We're Looking to Improve

There are two experiences we looking to improve in future releases:
  1. Printing (so you can print your embedded images)
  2. Visual Studio Live Share (so you can paste an image in code and have it instantly seen by everyone in the share)

Available in the Upcoming Release

This technology will ship in the upcoming CodeRush 18.1.2 release, expected later this week. We'll keep you updated.

Blog Post: DevExpress Dashboards - v18.2 and What You Can Expect in mid-November

$
0
0

Our v18.2 release is drawing closer and it is time to show you some of the features we have been working on. We also hope to gather some feedback, since it’s not too late yet to change things in case we forgot about something important.

Many of the features described in this post will be supported for all our target platforms:

  • WinForms, WPF
  • ASP.NET WebForms, MVC, Core
  • HTML5/JS Web Dashboard

In a few cases, support is limited to a smaller subset of platforms. This is mentioned in the respective feature sections.

Ready to Try

Several new features are ready for you to try (see details about access to the preview below). Here’s what’s new:

Tab Support

This is a large and highly requested feature: Tabs within DevExpress Dashboards! A detailed description has been published in this blog post.

Dashboard Tab Support

Dashboard Model

We have now published and documented Dashboard Model types for the Web Dashboard. This allows developers to create and modify dashboards and their elements from code. This has been possible from .NET code for WinForms and WPF in the past and there are many use cases: pre-populate data bindings for new items, apply default configurations like currencies or formats, react to designer events. All this can now be done from JavaScript or TypeScript!

var dashboard = dashboardControl.dashboard();
var grid = new DevExpress.Dashboard.Model.GridItem();
grid.name('grid (master filter)');
var dataSourceId = dashboard.dataSources()[0].componentName();
grid.dataSource(dataSourceId);
grid.interactivityOptions.masterFilterMode('Single');
var gridColumn = new DevExpress.Dashboard.Model.GridDimensionColumn(grid);
var dimension = new DevExpress.Dashboard.Model.Dimension();
dimension.dataMember('OrderDate');
gridColumn.dimension(dimension);
grid.columns.push(gridColumn);
grid.filterString(`[${dimension.uniqueName()}] <> 2010`);
dashboard.items.push(grid);
dashboard.rebuildLayout();

A preview of the documentation is available here. Please note that this is based on our TypeScript definitions, but it shows JavaScript in samples since it is more widely applicable. What do you think? Do you like the documentation?

We have created a knowledge base article with further details about the API: Web Dashboard Model Preview

Please feel free to post any thoughts about the API to the comments section on the Knowledge Base post!

Reload Data on the Web

On Windows client platforms it was already possible to reload data interactively, but this was technically more difficult to implement for the Web since users share data sources. Now it is possible for an end user to initiate the process of reloading data from the client side. This means that the Dashboard cache is invalidated and all Dashboard items are reloaded.

We have created a Knowledge Base entry for this feature here: Web Dashboard Reload Data Improvements

It would be very useful if you could share some details about your use cases for data reloading in the comments section on the Knowledge Base post.

Neutral Filter Mode

We have previously blogged about this feature, but it’s worth mentioning again! The Neutral Filter Mode improves usability of our filtering features by making them more efficient and removing certain “dead lock” scenarios.

Neutral Filter Mode

At this point we have modified our demos to use Neutral Filter Mode by default.

In the Works

In addition to those features that are ready for your scrutiny, we are currently working on a few others that we are not making available yet (but that will be in v18.2!).

Angular Integration

We found that Angular integration of our Web Dashboard was rather more complicated than it should be. We don’t offer an Angular wrapper so far, and we also don’t support modules. The lack of module support means that all client-side JavaScript frameworks, which typically use packaging systems like WebPack or SystemJS as part of the build process, have a hard time working with our Web Dashboards.

Modules in VS Code

We are making good progress with our work to modularize our code, but the changes have not been finalized yet and are not currently available to test.

Localization Improvements

We are restructuring and refactoring our localization constants for the Dashboard Codebase and Localization Service, which applies to all supported platforms. This work is in progress but will be completed for v18.2.

Formats for All Numbers

This feature is not part of our 2018 roadmap, but we learned from customer feedback and usability tests that some important numbers shown in dashboards can’t be formatted as required at this time. We have therefor started a review process of all numeric and DateTime values, to ensure there are format settings applicable to them.

Formats for All Numbers

Please feel free to let us know if you have any specific values in mind that are missing formatting options so far! We are likely to catch them, but better safe than sorry.

If There’s Time…

We have one other feature in mind that we will try to include for v18.2 if time allows.

Compact Range Filter

Currently, the only way to filter data by date or number ranges is to use the Range Filter Dashboard Item. This element is intuitive, informative and visually appealing, but for some setups it is just too large. We are considering options for a more compact range selection mechanism, including a simple pair of editors as well as a Range Filter in Compact Mode. We haven’t found a perfect solution yet, so any thoughts are particularly welcome in this area!

Access to a Preview Release

If you are an active Universal subscriber and would like to test the upcoming v18.2 features prior to the official release, please email our support team at support@devexpress.com or create a private ticket in the Support Center. With that, we can verify your account and provide you with a v18.2 preview installation privately.

If you are using a trial and want to try this feature today, you can purchase a DevExpress Universal license online (this will give you access to early builds such as this CTP). If you own a non-Universal subscription and are ready to upgrade, email us at clientservices@devexpress.com for preferential upgrade pricing.

Blog Post: XPO - What You Can Expect in mid-November (v18.2)

$
0
0

Your feedback counts!

As part of our ongoing commitment to support the needs of our XPO customers, the upcoming v18.2 release will ship with several new features. Many of them are inspired directly by customer feedback!

If you are an active DevExpress Universal subscriber and would like to test these features prior to its official release, please email our support team at support@devexpress.com or rather create a separate private ticket in the Support Center. With that, we can verify your account and provide you with a v18.2 preview installation privately.

If you are using a trial and want to use these features today, you can purchase a DevExpress Universal license online (this will give you access to early builds such as this CTP). If you own a non-Universal subscription and are ready to upgrade, email us at clientservices@devexpress.com for preferential upgrade pricing.

By providing early build access, we hope to find out whether our new features and solutions address your requirements and issues. Your testing efforts and your feedback help us deliver the best possible final implementation. We have described other benefits of this cooperation in this post.

In advance, thank you very much for your help!

Easy Way to Map a Property to a Read-Only Database Column

This is a highly requested feature - FetchOnlyAttribute. Applied to a class property or field, this attribute indicates that you can only read values from a database. XPO will not include these values in INSERT and UPDATE SQL statements. A detailed description was published in this blog post.

XPO for .NET Core / .NET Standard 2.0 Is Out of Beta and Related Enhancements

Persistent object JSON serialization makes it easy to use XPO as a Data Access layer in an ASP.NET Core Web API service. You no longer need to manually format JSON responses or make a POCO copy of each persistent class. For more information, refer to our example on GitHub.

For this release, we also worked on several features that we could make available in v18.1 as well:

At this stage, we moved XPO for .NET Core /.NET Standard 2.0 out of Beta and officially released it. All in all, XPO for .NET Core is ready for production. It nearly identical to XPO for the full .NET Framework (the 1% difference relates to some #ifdefs).

New XPO Data Source for XtraReports

XPObjectSource - is a new first-class citizen in DevExpress Reporting and is used to reduce the amount of code to bind reports with XPO data. The following examples illustrate the current approach with XPCollection and other general-purpose XPO data sources: E1845 | E3169.

XPObjectSource can be used at design time via the Report Wizard:

or dynamically, in code:

ReflectionDictionary dictionary = new ReflectionDictionary();
XPClassInfo classInfo = dictionary.QueryClassInfo(typeof(Entities.Products));
XPObjectSource dataSource = new XPObjectSource() {
	ConnectionStringName = "ConnectionString",
	EntityType = classInfo
};

using(XtraReport2 report = new XtraReport2()) {
	report.DataSource = dataSource;
	// ...
	// Preview the report or do something else.
	// ..
}

More flexibility to manage connection to a database in the ORM Data Model Wizard

You can now store the connection string in the configuration file instead of the model's code. It is less error-prone and safer. 

In the Works

There are a couple of things not mentioned in the Roadmap, but we hope to have them ready by the end of 2018 or in our next release:

  • Async API support for lengthy DB-intensive operations in XPO (powered by .NET 4.5 with C# 5);
  • Simplified SetPropertyValue, GetPropertyValue, GetCollection, GetList and other APIs in demos, documentation, code examples. Thanks to .NET’s Caller Information feature, we no longer need to pass the property name as a parameter.

Things from our hot backlog for discussion

In addition to important features like Migrations, there are a number of relatively easy to do usability features that are on our radar:

  • A family of methods like "FindFirstObject<ClassType>(CriteriaOperator criterion, SortingCollection sorting, bool selectDeleted, bool force)" with parameters like XPClassInfo, SortProperty instead of SortCollection, etc.;
  • Force all Oracle connection providers to take the ObjectOwner value into consideration when a database schema is generated;
  • An easier way to clear all objects from XPCollection - for instance, the RemoveAll method (T512390);
  • Ensure that all internal tests pass for MS SQL Server 2017 and update corresponding documentation;
  • Implement the ICustomFunctionOperatorConvertibleToExpression and ICustomFunctionOperatorCompileable interfaces for the IsInstanceOfType and IsExactType functions so that they can be converted to LINQ expressions.
  • AutoCreateOption.SchemaAlreadyExists only for certain persistent classes or SQL Synonyms support (T544848 | T630869).

If you comment on these or on other features you consider important, please include specific use-case scenarios, previous ticket IDs, current solutions and their costs. This will help us prioritize our finite resources better.

Interesting Support Center tickets

  • We bypassed another Mono issue with System.Data.SqlClient and System.Drawing.Common assemblies in a Xamarin app (T661502 | T643780);
  • We clarified that it's a significant task to implement custom Server Mode/Instant Feedback providers and collected all relevant information in one place (S19875).
  • If XPQuery contains non-persistent properties, we throw an exception that lists them (to help you diagnose the root cause of these errors). We also described possible solutions if such non-persistent properties are used intentionally (T523335).
  • We discussed ways to diagnose the "Reentrancy or cross thread operation detected" error (T419520);
  • We discussed that ExplicitLoadingAttribute has no impact on collection-type properties and ways to pre-load collections together with the master object (T672387);
  • We discussed how to store and manipulate data in memory with InMemoryDataStore and copy it between data stores (T671249).
Find more interesting customer questions and product enhancements for your favorite products in the DevExpress Support Center (expand the "Frameworks (XAF & XPO)" group on the right) and What's New documentation (see resolved issues). 

XPO is in the Real World

See how we use XPO internally and how you too can leverage its flexibility and performance within your enterprise.

Love XPO and want to help us promote it? Add the package through Nuget.org instead of DevExpress Nuget!

Blog Post: Office File API Subscription – v18.2 and What You Can Expect in mid-November

$
0
0

The upcoming release of our Office File API Subscription (v18.2) will include some major improvements in document rendering and our printing and export engine. 

Right-To-Left Support

We are improving how the DevExpress Word Processing Document API processes documents with RTL content. This new feature will allow you to load, print and export (to PDF) documents with the right-to-left text direction. Full RTL support will not be completed in this release cycle (for instance, we will not be able to reorder table columns in RTL documents), but our goal is to deliver a solution that addresses the broadest possible rendering scenarios in v18.2. 

Shape Support

With this release, the DevExpress Word Processing Document API will support major shape types. 

As you might expect, the new release will allow you to print and export (to PDF) documents that contain shapes. Please note that this update will not include an API to manage shapes in code. In addition, a few restrictions will remain when rendering complex shape groups. 

Continuous Section Breaks

Our new Word Processing Document API will allow you to load, print and export documents with continuous section breaks. You can control this option in code using our implemented API. 

Paragraph Options

This release will include a group of new and improved paragraph options: 

Widow/Orphan Lines Control

You can now use the Widow/Orphan Control feature in our Word Processing Document API to prevent the first or last paragraph line from appearing at the bottom or top of a page. 

Keep Lines Together and Keep with Next Options

We have improved our "Keep lines together" option so that it mirrors Microsoft Word. In addition, we’ve introduced a new "Keep with next" option so you can keep multiple paragraphs on the same page. 

Paragraph Borders

Our Word Processing Document API now supports paragraph borders. You can load/save, print and export (to PDF) documents with paragraph borders. 

v18.2 will not fully support paragraph options in tables. We are aware of this limitation and will resolve this restriction in future release cycles. 

Spreadsheet Document API Improvements

Rich Text API

With this release, you can programmatically create and edit rich formatted text within a cell. We are focused on extending this capability and in future iterations, will introduce printing and export options for rich text content. 

Shape API

You can now programmatically create new shapes, connect and group them, change a shape’s fill and outline settings, add text to a shape, and remove shapes from a document. 

Sparklines Rendering

With this release, sparklines can be printed and exported to PDF. 

PDF Document API changes

In our last release cycle (v18.1), we announced the availability of DirectX document rendering support. With our upcoming release (v18.2), DirectX rendering will move out of beta and will be used as our default rendering engine.  

Try it now!

If you are an active DevExpress Universal subscriber and would like to test these features prior to its official release, please email our support team at support@devexpress.com or create a separate private ticket in the Support Center. With that, we can verify your account and provide you with a v18.2 preview installation private. 

If you are using a trial and want to use these features today, you can purchase a DevExpress Universal license online (this will give you access to early builds such as this CTP). If you own a non-Universal subscription and are ready to upgrade, email us at clientservices@devexpress.com for preferential upgrade pricing. 

Viewing all 3388 articles
Browse latest View live