Quantcast
Channel: Developer Express Global
Viewing all 3388 articles
Browse latest View live

Blog Post: How to Change the Default Data Service URL in XAF Mobile Applications at Runtime

$
0
0

We've created a KB article that describes how you can extend your XAF mobile application so that can change the application's Data Service dynamically after logon:

https://www.devexpress.com/go/XAF_Try_Mobile_DataServiceUrlSelection_v17.1_August.aspx

This information will be helpful to those who need to supply the same application to different customers (companies). Company data should be stored separately in different databases. The database (or, to be more precise, the Data Service connected to it) should be selected in one of the following ways: 
- The user enters his or her credentials, and the application's Data Service is changed dynamically based on the logged in user.
- The user specifies his or her Data Service manually in the logon screen.

It's possible that we'll extend this feature so that you'll not need to maintain separate data services for each company (a different database will be chosen dynamically), but first, we would love to learn whether the current implementation covers your specific use-case scenarios.


Your feedback is needed!
This is not an official feature of our Mobile UI (CTP) and our API may change in future release cycles. We are publishing this article prior to the 17.2 release to collect early user feedback and improve overall functionality. We would appreciate your thoughts on this feature once you've had the opportunity to review it. Please report any issues, missing capabilities or suggestions in separate tickets in our Support Center. Thanks for your help in advance!

Test XAF's newest features prior to the 17.2 release!

We want to hear what you think - please don't forget to check out my other blog posts on upcoming XAF features...
    Performance improvements (Core)
    OAuth2 authentication (Web)
    Barcode scanner (Mobile)
    Push Notifications (Mobile)
    Background Geolocation (Mobile)

Blog Post: Announcing a DevExtreme Project Generator

$
0
0

Getting started is the hardest part.

Apparently K.C.Sherwood said that first, but all software developers know it very well. Once you’ve grasped a concept, you can run with it, but grasping it in the first place can be much harder than the shortness of the word grasp suggests.

Enough philosophy. Getting started with DevExtreme isn’t hard, exactly, but the installation instructions can seem complex to the first-time reader. I think we’re doing a pretty good job on those instructions, it’s just that the world of JavaScript is complex these days and we try to fit in with several different approaches you might want to take.

To make it easier for you to create new projects that integrate DevExtreme, I have made a generator available. It is based on Yeoman’s yo command, which is based, in turn, on Node.js. It lends itself particularly well to those projects that use Node.js anyway, but then Node.js is a ubiquitous runtime environment these days, likely to be found on most developer machines.

Go try it!

I have written a nice and detailed documentation page for the generator, so I’m not going to repeat everything here. Follow this link to see the README with all the instructions you need.

Note that at the bottom of the README there is a table with links to various sample repositories, where you can browse projects created by the generator, in case you just look for inspiration for your own existing project.

I have good faith that the generator does what it should, but realistically I also expect bugs. Please report any issues directly on github.

Blog Post: Microsoft Identity and XPO: A true universal storage provider for more than a dozen different databases

$
0
0

Shortly after Microsoft introduced their Identity system as a replacement for the ASP.NET Membership API, there was some documentation published about it's architecture and a nice sample showed up at the Microsoft web-site on how to use MySQL instead of MS SQL Server to store the information by creating a custom storage provider.

I immediately though about creating something similar based with our own great ORM tool eXpress Persistent Objects (XPO).

One of the big advantages of XPO is that it supports more than a dozen database back-ends out of the box like: Advantage, SQL Anywhere, Sybase, DB2, Interbase/Firebird, MS-Access, Oracle, Pervasive, PostgreSQL, SQLite, VistaDB and yes; MS SQL Server and MySQL!

You can read more about the supported DB systems and their versions here.

I started this little project quite some time ago, but only recently had some time to finish it off and share it with you.

A quick overview on the architecture and what needs to be implemented

As I mentioned before, the documentation about ASP.NET Identity is well done and you can read all about it here, so I will not dive too deep into that.

To understand which parts of the architecture of Identity are being handled by the XPO based storage provider, you can take a look at the following diagram which describes the global architecture of Identity:

ASP.NET ApplicationYour project
ManagersUserManager, RoleManager etc.
StoresUserStore, RoleStore etc.
Data Access LayerXPO
Data SourceDatabase

As you can see, the Data Access Layer will be implemented with XPO, and we need to create Store and Manager classes to facilitate the XPO based data layer.

The last step is to make a couple of smaller changes in your project's ~/App_Start/IdentityConfig.cs file to instantiate the correct Manager objects for you application.

Some goals I want to achieve

There are a couple of things I want to achieve with this package.

Easy to get

The end-result for me would be that the changes you need to make to your project should be as little as possible, and I want this all being packed up in a NuGet package, so the storage provider can be easily included in your project.

This last point raises a question: "This Nuget package will be released on NuGet, but XPO is neither open-source nor free, but it is available for all of our paying customers. How do we solve this?"

Fortunately, that is (since a couple of months) fairly simple: Remember this blogpost about the DevExpress NuGet feed?

This means that if you have configured the DevExpress NuGet feed in Visual Studio or in the NuGet.targets file of your solution, this Storage Provider package can have a dependency to the DevExpress.Xpo package.

Easy to setup

I want this to be setup as easy as possible. This means that even if you want to include it in a project which doesn't use XPO, you should not be bothered with the initialization of XPO. Also if you do use XPO, it should not get in your way.

This means there is a small package as a dependency which contains some generic helper code for XPO which I use through-out projects. If you think this is convenient, feel free to use it as well.

What needs to be done?

It all starts with a small data model which will be represented by the XPO classes in this project. Below, there is a schematic overview of this model:

This model is pretty much the same as what is being used in the Entity Framework storage provider where I would like to point out one interesting detail; all the persistent classes descend from the XpoDxBase class. Besides the fact that all descendants will have an Id, AddStampUTC and ModStampUTC field, there is another reason for this. It will become clear later in this post.

A quick look at the original provider

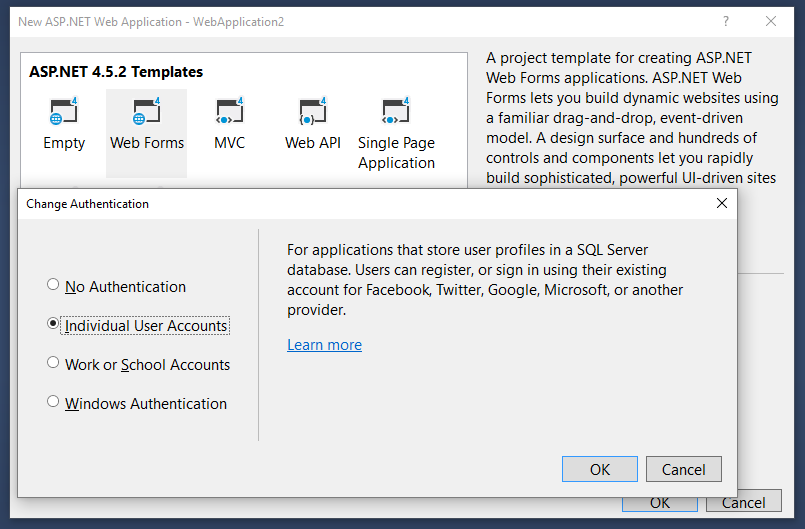
Let's create a new project with individual authentication in Visual Studio.

NewProject

If we now take a look at ~/App_Start/IdentityConfig.cs, there is the ApplicationUserManager class being generated which descends from a generic base class UserManager<ApplicationUser>.

public class ApplicationUserManager : UserManager<ApplicationUser>
{
    public ApplicationUserManager(IUserStore<ApplicationUser> store)
        : base(store)
    {
    }

    // ... more code ...
}

The generic class determines which class to use to represent users in the manager. This ApplicationUser can be found in the ~/Models/IdentityModels.cs file:

public class ApplicationUser : IdentityUser
{
    public ClaimsIdentity GenerateUserIdentity(ApplicationUserManager manager)
    {
        // Note the authenticationType must match the one defined
        // in CookieAuthenticationOptions.AuthenticationType
        var userIdentity = manager.CreateIdentity(this,
                    DefaultAuthenticationTypes.ApplicationCookie);
        // Add custom user claims here
        return userIdentity;
    }

    public Task<ClaimsIdentity> GenerateUserIdentityAsync(
        ApplicationUserManager manager)
    {
        return Task.FromResult(GenerateUserIdentity(manager));
    }
}

The same approach is used for the SignIn manager:

public class ApplicationSignInManager : SignInManager<ApplicationUser, string>
{
    public ApplicationSignInManager(ApplicationUserManager userManager,
            IAuthenticationManager authenticationManager) :
        base(userManager, authenticationManager) { }

    public override Task<ClaimsIdentity> CreateUserIdentityAsync(ApplicationUser user)
    {
        return user.GenerateUserIdentityAsync((ApplicationUserManager)UserManager);
    }

    public static ApplicationSignInManager Create(
        IdentityFactoryOptions<ApplicationSignInManager> options,
        IOwinContext context)
    {
        return new ApplicationSignInManager(
                context.GetUserManager<ApplicationUserManager>(),
                context.Authentication);
    }
}

The reason for this approach is that you can easily use your own classes in case you want to store additional account information like address or day of birth. This is something I want to incorporate in the XPO Storage provider as well.

There is one interesting thing to notice in the ApplicationUser class; it is inherited from the IdentityUser class which in its turn is inherited from a generic IdentityUser class.

The idea behind this is very nice, since this gives us the possibility to customize a couple of things like the type of the identity field and the types for Role, Login and Claim entities.

In coorporation with Entity Framework, you don’t need to do a lot of additional things because these classes can be directly used in the DbContext of Entity Framework.

We could use the same approach for XPO by following these steps, but a better way is to use the DTO design pattern which gives us more flexibility in the end.

The DX.Data.Xpo package

This package contains some code I use through-out different projects and it will serve as a base for the Identity Storage provider as well. Let’s go quickly through the files.

XpoDatabase

This class has the XPO related initialization code as described in the documentation. It also has some experimental features which are not used in the Identity Storage provider like working with different datalayers to copy data.

The most important code in this class are some helper methods to by used in the Async methods of the storage provider.

public class XpoDatabase : IDisposable
{

    //... more code ...

    public virtual void Execute(Action<XpoDatabase, Session> work,
            bool transactional = true, bool commit = true)
    {
        using (Session s = transactional ? GetUnitOfWork() : GetSession())
        {
            work(this, s);
            if (transactional && commit && (s is UnitOfWork))
                ((UnitOfWork)s).CommitChanges();
        }
    }

    public virtual T Execute(Func<XpoDatabase, Session, T> work,
            bool transactional = true, bool commit = true)
    {
        T result = default(T);
        using (Session s = transactional ? GetUnitOfWork() : GetSession())
        {
            result = work(this, s);
            if (transactional && commit && (s is UnitOfWork))
                ((UnitOfWork)s).CommitChanges();
        }
        return result;
    }

    //... more code ...

}

XpoStore

This generic helper class makes it easy to select a bunch of objects en perform updates on that collection.

XpoDtoDatasource

The XpoDtoDatasource class deals with the XPO entities and the DTO classes and serves as a (good old) ObjectDatasource implementation at the same time.

Since the XpoDatasource class is an abstract generic class, you will need to implement it for all entities. This class relies on the XpoDatabase class.

DX.Data.Xpo.Identity

This is what the blogpost is all about, the universal storage provider for Identity.

The project is setup quite straightforward. There are a number of DTO classes which are inherited from the Identy classes, but implement an interface to support the DTO mechanism built in the DX.Data.Xpo project.

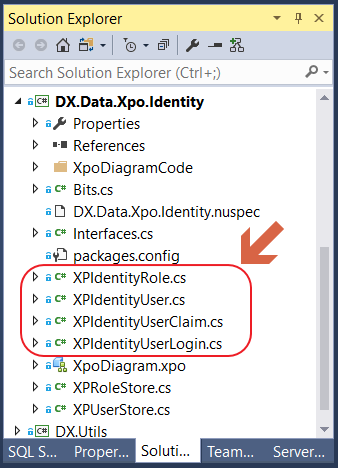
The DTO classes are prefixed with XP like shown in the image below:

image

The structure of these files are pretty much the same, there is a generic class which allows us to fine-tune certain things like key type and some other type depending on the class.

If we take a look at the XPIdentityRole.cs file, there is the generic class:

public abstract class XPIdentityRole<TKey, TXPORole> :
    XpoDtoBaseEntity<TKey, TXPORole>, IRole<TKey>, IDxRole<TKey>
    where TKey : IEquatable<TKey>
    where TXPORole : XPBaseObject, IDxRole<TKey>
{
    public XPIdentityRole(TXPORole source, int loadingFlags) :
            base(source, loadingFlags)
    {
        Users = new List<IDxUser<TKey>>();
    }

    public XPIdentityRole(TXPORole source) :
            this(source, 0)
    {

    }
    public XPIdentityRole() :
            this(null, 0)
    {

    }

    public virtual ICollection<IDxUser<TKey>> Users { get; protected set; }
    public virtual IList UsersList { get { return Users.ToList(); } }

    public override TKey Key { get { return Id; } }
    public TKey Id { get; set; }
    public string Name { get; set; }

    public override void Assign(object source, int loadingFlags)
    {
        var src = CastSource(source);
        if (src != null)
        {
            this.Id = src.Key;
            this.Name = src.Name;
        }
    }
}

And for easy and standard use, there is the non-generic class:

public class XPIdentityRole : XPIdentityRole<string, XpoDxRole>
{
    public XPIdentityRole(XpoDxRole source) :
            base(source)
    {
    }
    public XPIdentityRole(XpoDxRole source, int loadingFlags) :
            base(source, loadingFlags)
    {
    }
    public XPIdentityRole()
    {
    }
}

Instead of doing the Assign implementation manually, we could use something like Automapper instead, but I like to have the full control here.

The UserStore and RoleStore

With all the preparations described earlier, the actual implementation of the stores for the Storage provider is pretty straightforward. Again, I've created a full generic class which implements all the Identity interfaces including Claims and Logins support. Next there is a more simplyfied generic class, which only has the generic types which are going to be used in the ~/App_Start/IdentityConfig.cs of your project.

Below is the code for the RoleStore which also shows how to deal with the Async methods by using the code from the DX.Data.Xpo library.

public class XPRoleStore<TKey, TRole, TXPORole> : XpoStore<TXPORole, TKey>,
    IQueryableRoleStore<TRole, TKey>
    where TKey : IEquatable<TKey>
    where TRole : XPIdentityRole<TKey, TXPORole>, IRole<TKey>
    where TXPORole : XPBaseObject, IDxRole<TKey>, IRole<TKey>
{
    public XPRoleStore() :
        base() {  }
    public XPRoleStore(string connectionName) :
        base(connectionName) { }
    public XPRoleStore(string connectionString, string connectionName) :
        base(connectionString, connectionName) { }
    public XPRoleStore(XpoDatabase database) :
        base(database) { }

    #region Generic Helper methods and members

    protected static Type XPORoleType { get { return typeof(TXPORole); } }
    protected static TXPORole XPOCreateRole(Session s)
    {
        return Activator.CreateInstance(typeof(TXPORole), s) as TXPORole;
    }

    #endregion

    public IQueryable<TRole> Roles
    {
        get
        {
            XPQuery<TXPORole> q = new XPQuery<TXPORole>(GetSession());
            var result =
                from u in q
                select Activator.CreateInstance(typeof(TRole), u as TXPORole) as TRole;
            return result;
        }
    }

    public Task CreateAsync(TRole role)
    {
        ThrowIfDisposed();
        if (role == null)
            throw new ArgumentNullException("role");

        return Task.FromResult(XPOExecute<object>((db, wrk) =>
        {
            var xpoRole = XPOCreateRole(wrk);
            xpoRole.Assign(role, 0);

            return null;
        }));
    }

    public Task DeleteAsync(TRole role)
    {
        ThrowIfDisposed();
        if (role == null)
            throw new ArgumentNullException("role");

        return Task.FromResult(XPOExecute<object>((db, wrk) =>
        {
            wrk.Delete(wrk.FindObject(XPORoleType,
                    CriteriaOperator.Parse($"{KeyField} == ?", role.Id)));
            return null;
        }));
    }

    public Task<TRole> FindByIdAsync(TKey roleId)
    {
        ThrowIfDisposed();

        return Task.FromResult(XPOExecute((db, wrk) =>
        {
            var xpoRole = wrk.FindObject(XPORoleType,
                    CriteriaOperator.Parse($"{KeyField} == ?", roleId));
            return xpoRole == null ?
                    null :
                    Activator.CreateInstance(typeof(TRole), xpoRole, 0) as TRole;
        }));

    }

    public Task<TRole> FindByIdAsync(string roleId)
    {
        ThrowIfDisposed();

        return Task.FromResult(XPOExecute((db, wrk) =>
        {
            var xpoRole = wrk.FindObject(XPORoleType,
                    CriteriaOperator.Parse($"{KeyField} == ?", roleId));
            return xpoRole == null ?
                    null :
                    Activator.CreateInstance(typeof(TRole), xpoRole, 0) as TRole;
        }));
    }

    public Task<TRole> FindByNameAsync(string roleName)
    {
        ThrowIfDisposed();
        if (String.IsNullOrEmpty(roleName))
            throw new ArgumentException("roleName is null or empty");

        return Task.FromResult(XPOExecute((db, wrk) =>
        {
            var xpoRole = wrk.FindObject(XPORoleType,
                    CriteriaOperator.Parse("NameUpper == ?",
                                                roleName.ToUpperInvariant()));
            return xpoRole == null ?
                    null :
                    Activator.CreateInstance(typeof(TRole), xpoRole, 0) as TRole;
        }));

    }

    public Task UpdateAsync(TRole role)
    {
        ThrowIfDisposed();
        if (role == null)
            throw new ArgumentNullException("roleName");

        return Task.FromResult(XPOExecute<object>((db, wrk) =>
        {
            TXPORole r = wrk.FindObject(XPORoleType,
                            CriteriaOperator.Parse($"{KeyField} == ?",
                                                    role.Id)) as TXPORole;
            if (r != null)
            {
                r.Assign(role, 0);
            }
            return null;
        }));
    }
}

The second less generic class can look as simple as below:

public class XPRoleStore<TRole, TXPORole> : DxRoleStore<string, TRole, TXPORole>
    where TRole : XPIdentityRole<string, TXPORole>, IRole<string>
    where TXPORole : XPBaseObject, IDxRole<string>, IRole<string>
{
    public XPRoleStore() :
        base() { }
    public XPRoleStore(string connectionName) :
        base(connectionName) { }
    public XPRoleStore(string connectionString, string connectionName) :
        base(connectionString, connectionName) { }
    public XPRoleStore(XpoDatabase database) :
        base(database) { }
}

For the UserStore, there is a bit more code involved. You can check that out by cloning or forking the project. Once you go through the code, you'll see that the approach is quite the same as the RoleStore.

How to use this in your own WebApp

I have mentioned a couple of directions on where to change things after you've completed the project template. Let's summarize the steps below:

  • First make sure you have your personal DevExpress NuGet feed configured as described here
  • Next, we can add the DX.Data.Xpo.Indentity package
  • Now there are a couple of things we need to change in code:
    • In ~/App_Start/IdentityConfig.cs and ~/Models/IdentityConfig.cs we need to replace:

      using Microsoft.AspNet.Identity.EntityFramework;

      with

      using DX.Data.Xpo.Identity;
    • Now we also need to change some code in the ApplicationUser which is located in ~/Models/IdentityConfig.cs. Replace the class with:
      public class ApplicationUser : XPIdentityUser<string, XpoApplicationUser>
      {
          // don't forget the constructors !!!
          public ApplicationUser(XpoApplicationUser source) :
              base(source)
          {
          }
      
          public ApplicationUser(XpoApplicationUser source, int loadingFlags) :
              base(source, loadingFlags)
          {
          }
      
          public ApplicationUser() :
              base()
          {
          }
      
          public override void Assign(object source, int loadingFlags)
          {
              base.Assign(source, loadingFlags);
              //XpoApplicationUser src = source as XpoApplicationUser;
              //if (src != null)
              //{
              //	// additional properties here
              //	this.PropertyA = src.PropertyA;
              //	// etc.
              //}
          }
          public ClaimsIdentity GenerateUserIdentity(ApplicationUserManager manager)
          {
              // Note the authenticationType must match the one defined in
              // CookieAuthenticationOptions.AuthenticationType
              var userIdentity = manager.CreateIdentity(this,
                                  DefaultAuthenticationTypes.ApplicationCookie);
              // Add custom user claims here
              return userIdentity;
          }
      
          public Task<ClaimsIdentity> GenerateUserIdentityAsync(
                  ApplicationUserManager manager)
          {
              return Task.FromResult(GenerateUserIdentity(manager));
          }
      }
    • Since the ApplicationUser is a DTO class, we also need to add the persistent counterpart. This is the class which will be stored in the database by XPO. You can add it to the ~/Models/IdentityConfig.cs.
      // This class will be persisted in the database by XPO
      // It should have the same properties as the ApplicationUser
      [MapInheritance(MapInheritanceType.ParentTable)]
      public class XpoApplicationUser : XpoDxUser
      {
          public XpoApplicationUser(Session session) : base(session)
          {
          }
          public override void Assign(object source, int loadingFlags)
          {
              base.Assign(source, loadingFlags);
              //ApplicationUser src = source as ApplicationUser;
              //if (src != null)
              //{
              //	// additional properties here
              //	this.PropertyA = src.PropertyA;
              //	// etc.
              //}
          }
      }
    • Next we need to initialize the ApplicationUserManager by using the XPUserStore. Because of the generic setup, we can easily specify the XPO persistent class together with the DTO class:
      public class ApplicationUserManager : UserManager<ApplicationUser>
      {
          public ApplicationUserManager(IUserStore<ApplicationUser> store)
              : base(store)
          {
          }
      
          public static ApplicationUserManager Create(IdentityFactoryOptions<ApplicationUserManager> options, IOwinContext context)
          {
              var manager = new ApplicationUserManager(new XPUserStore<ApplicationUser, XpoApplicationUser>(context.Get<XpoDatabase>()));
      
              // ...
          }
      
          // ...
      }
            
    • And the last thing we need to change is the ApplicationDbContex class. It is also in ~/Models/IdentityConfig.cs. In XPO there is no DBContext class so:
      public class ApplicationDbContext
      {
          public static DX.Data.Xpo.XpoDatabase Create()
          {
              return new DX.Data.Xpo.XpoDatabase("DefaultConnection");
          }
      }
  • And finally we can remove the Microsoft.AspNet.Identity.EntityFramework NuGet package as well as the EntityFramework package from the project.

    image

Getting the packages and source

The NuGet packages are already available on NuGet.org so you can just add them to your project.
Do note that building your project does not work if you don't have your personal DevExpress NuGet feed configured!

If you want to check out all of the code, feel free to fork or clone the repo from my GitHub account at: https://github.com/donwibier/DXWeb. This code is free to use and you can contact me by replying on this blog post. You can even do a pull-request in case you found something in my code.

Let me know if this is interesting and/or usefull for you.

Blog Post: DevExtreme on GitHub: Pre-Releases, Sprints, & Upcoming Demos

$
0
0

Back in March 2017, we began to publicly host our DevExtreme source code on GitHub. One of the benefits of GitHub source hosting is that we can provide developers with 'pre-release' builds easily.

Pre-Release

I'm happy to announce that DevExtreme pre-release builds are now available. A pre-release build allows you to experience some of the new controls and features that will be part of future releases. In fact, a pre-release is now available that has DevExtreme v17.2 features. The DevExtreme v17.2 final release is will be available later this year.

The pre-releases are available for download on the DevExtreme GitHub releases page:

https://github.com/DevExpress/DevExtreme/releases

What's in the pre-release?

The current pre-release is labeled '17.2 Sprint 6' and includes improvements for DataGrid, Scheduler, and Editor controls. You can read the release notes here:

https://github.com/DevExpress/DevExtreme/releases/tag/17.2.0-sprint.6

However, this is not the first v17.2 pre-release build. We published the '17.2 Sprint 5' a few weeks ago and it includes our new (upcoming) data visualization widget: dxFunnel.

Now, as software developers, you'll know that not every build will have something interesting. That said, I recommend that you 'watch' our repo so that you do not miss any pre-release news.

Sprints

Our DevExtreme dev team uses Agile and works in sprints that last two weeks. Therefore, you can expect a pre-release about every two weeks.

NPM & Bower packages too

You can download pre-release packages from NPM:

npm i devextreme@17.2.1-pre-17248

and Bower too:

bower install devextreme#17.2.1-pre-17248

Watch the repo

Click the "watch" button on the DevExtreme GitHub repo and you will get notifications when we release a new preview build.

Warning

Please be aware of the following regarding 'pre-release' software:

Products marked as pre-release (Beta, Community Technology Preview "CTP", or Release Candidate "RC") may contain deficiencies and as such, should not be considered for use or integrated within any mission critical software application. DevExpress may discontinue availability of its pre-release software, limit or modify software functionality, or eliminate support services at any time.

Our intention with pre-release software is for the early-adopters who want to preview, test, and provide feedback to help us improve upcoming features, controls, etc.

I recommend reading our 'pre-release' software web page.

Preview Demos

We're also working on publishing our demos on GitHub too. This will be available as a new devextreme demos repo soon and allow you to test pre-release features demos.

What do you think about the DevExtreme pre-releases on GitHub? Drop me a line below.

Email: mharry@devexpress.com

Twitter: @mehulharry


Create highly responsive web apps for touch-enabled devices and traditional desktops.

From desktops to mobile devices, DevExtreme HTML5 Data Grid delivers the flexibility you’ll need to build apps that reach the widest audience and deliver touch-first user experiences to power your next great interactive website.

Download a free and fully-functional version of DevExtreme now: Download DevExtreme

Blog Post: Webinar: Bootstrapping your Web App with DevExpress

$
0
0

This week I presented the webinar about our DevExpress Bootstrap Controls. You can rewatch it on our YouTube channel.

image

I took an existing third party Bootstrap design from startbootstrap.com and showed how easy it is to incoprorate the DevExpress Bootstrap Controls in the design.

If you want to use this approach in your own application, make sure to take a Bootstrap v3 theme!

The DevExpress controls will render Bootstrap v3 compliant HTML since Bootstrap v4 is still in Beta.

If you want to play around with the app I created, feel free to clone or fork the project from GitHub at: https://github.com/donwibier/DXBootstrap

Did you  create a Bootstrap based Web App with the DevExpress Bootstrap controls, let me know by replying on this post or by sending me an e-mail.

Blog Post: XAF - New example, updated documentation on property editors and yet more updates on the Mobile UI development

$
0
0

We've added a mobile property editor to the following Support Center example: How to show a hyper link (URL, email, etc.) for a business class property. The example demonstrates how to create custom data representations (hyperlinks) for your text properties. To view implementation details, open the example's page and show MobileHyperLinkStringPropertyEditor.cs/vb in the code file selector at the bottom.

If you create and deploy a mobile XAF app using this custom editor, it will look like the following:


We have also published numerous online documentation updates for related mobile and core XAF APIs demonstrated earlier. For instance, the following topics have been updated to describe mobile versions of property editors for various data types:

String Properties   - Numeric Properties   - Date and Time Properties   - Boolean Properties   - Collection Properties   - Reference (Foreign Key, Complex Type) Properties   - File Attachment Properties   - Enumeration Properties   - Type Properties

In addition to screenshots and text descriptions, the most interesting information for developers would be links to corresponding DevExtreme widgets on which these mobile property editors are based on. This documentation is not yet finished, and we hope to provide more information on extending the standard XAF mobile UI with custom-tailored editors in the coming weeks.

Additionally, we have improved documentation that helps explain how you can register XAF property editors:

In particular, the EditorAlias-based approach is demonstrated in the aforementioned example.


As a side note,  I wanted to remind everyone that XAF 17.1.6 (released this week) provides a simpler way to register plugins through the new MobileApplication > AdditionalPhoneGapPlugins property (instead of the general-purpose CustomizePhoneGapConfig event). Also note that our most active customers are testing custom PhoneGap plugins integration based on the examples we published recently (onetwothree). For instance, here is how one customer from the Netherlands (thanks, Martin!) is testing

the background geolocation tracking plugin integration in an XAF mobile app when walking with his two dogs:

The mobile user's route on the map in a separate administrative XAF Web application

Martin's dogs

Should you have any questions, feel free to leave a comment. Happy XAFing!

Blog Post: This week DevExpress is in Stockholm, Sweden

$
0
0

From Monday, September 18th and Tuesday, September 19th, DevIntersection Europe is happening in Stockholm, Sweden. This time it is all about the .NET Core v2 launch.

image

DevExpress is proud to be partner and John and I are available on location to hand out goodies and give some nice demo’s and answer questions.

The speaker line-up as really good and I’m proud to present a session myself.

If you’re at DevIntersection Europe, come by and say ‘hi’!

Blog Post: DevExtreme MVC Client-Side Validation: [Required] Attribute Changes (17.1.6)

$
0
0

We received some feedback from our customers about an issue with how the DevExtreme MVC CheckBox Control handles client-side validation.

The main issue they found was that when using the MVC CheckBox control on a form that needed to be submitted, the user had to check the box before they could submit the form even if the field is not marked as 'Required' on your data model.

This was an odd issue because when we looked at the server-side model, we didn't find any attribute that would've require the "true" value only. So then why does our CheckBox control enforces the 'required' check?

DevExtreme Client-Side Validation

A Few Words About DevExtreme Validation

DevExtreme ASP.NET MVC Controls are, basically, client-side JavaScript DevExtreme widgets wrapped in native ASP.NET MVC server-side controls. Client-side editors have a set of validation rules that are mapped to attributes of the server-side model. This way, the editors can generate validation rules based on the attributes automatically.

The Root of the Problem

After some debugging and research, we discovered that the 'Required' attribute is implicitly attached to non-nullable properties, such as the Boolean property in our case. This was confirmed in a note to the AddImplicitRequiredAttributeForValueTypes property in ASP.NET MVC documentation.

So what happens if we use the native MVC check box control, will it still display the same issue? Turns out, no, it does not because the native check box control ignores the 'required' check.

Then we compared the results of validating a value against the 'required' rule in DevExtreme with that in jQuery Unobtrusive used in ASP.NET MVC projects by default. Here's what we found:

ValuejQuery UnobtrusiveDevExtremeMatch
nullinvalidinvalid
numbervalidvalid
empty stringinvalidinvalid
non-empty stringvalidvalid
DateTimevalidvalid
truevalidvalid
falsevalidinvalid

The crucial difference turned out to be in how the "false" value is handled. jQuery Unobtrusive validation accepts both "true" and "false" values of a Boolean property. DevExtreme validation, which adopts the HTML5 behavior, considers "false" an invalid value, and as a result, doesn't let the user submit the form unless the CheckBox is checked.

Now that the mystery is uncovered, we found two possible ways to work around this issue:

  1. set to "false" the AddImplicitRequiredAttributeForValueTypes property
  2. use a nullable bool type instead of bool type in your application

Unfortunately, both of these would not work for all users.

Solution

To provide a good solution that will work for all customers, we're introducing a new global flag called Compatibility.Validation.IgnoreRequiredForBoolean in the v17.1.6 release.

When set to true, the DevExtreme validation engine will ignore the Required validation rule for bool type, which is the proper mode for MVC apps. When set to false, it keeps the previous DevExtreme or HTML5 like behavior. The default setting will be set to false in versions 17.1.x.

We've updated our project templates and you'll find this new flag in:

  • "Global.asax" file for classic MVC on VB or CS
protected void Application_Start()
{
  DevExtreme.AspNet.Mvc.Compatibility.Validation.IgnoreRequiredForBoolean = false;
  // ... the rest of your code ...
}
Protected Sub Application_Start()
{
  DevExtreme.AspNet.Mvc.Compatibility.Validation.IgnoreRequiredForBoolean = False' ... the rest of your code ...
}
  • "Startup.cs" file for ASP.NET Core MVC
public void Configure(IApplicationBuilder app, IHostingEnvironment env, ILoggerFactory loggerFactory)
  DevExtreme.AspNet.Mvc.Compatibility.Validation.IgnoreRequiredForBoolean = false;
  // ... the rest of your code ...

How to use Required for bool type when IgnoreRequiredForBoolean is enabled?

You can decorate your model properties with the [DevExtremeRequired] attribute. This attribute supports the HTML5 behavior for bool type on a client and on the server side. For all other value types, it's behavior is similar to using the 'Required' attribute.

Beware: will change in v.17.2

The global flag is "false" by default in v17.1, however, it'll change to "true" in v17.2.

Twitter: @mehulharry


Create highly responsive web apps for touch-enabled devices and traditional desktops.

From desktops to mobile devices, DevExtreme HTML5 Data Grid delivers the flexibility you’ll need to build apps that reach the widest audience and deliver touch-first user experiences to power your next great interactive website.

Download a free and fully-functional version of DevExtreme now: Download DevExtreme


Blog Post: CodeRush for Roslyn 17.1.8 is Available

$
0
0

Another 30 days, another release of CodeRush for Roslyn. This release brings improvements in .NET Core 2.0 support, code formatting, code analysis, code providers, and templates.

.NET Core 2.0 Support

The Unit Test Runner now runs .NET Core 2.0 tests and can calculate Code Coverage in Portable PDB debug-symbols-format projects. Also, the Unit Test Runner gets a performance boost when running .NET Core tests.

Code Formatting

We have added a new code formatting feature that controls spacing options in your code. Now you can add or omit spaces around virtually every part of code, with more formatting options available than what you get with Visual Studio alone. Spacing style code formatting rules are applied with the Code Cleanup feature.

Formatting_Spaces

We have also improved XAML formatting, adding the ability to format markup extensions. You can now control the following options:

  • Break arguments apart only if the argument count for an element exceeds a specified count.
  • Align markup extension arguments with first argument.


Code Analysis

This release includes a preview of a new feature we’ve been working on, NullReferenceException Analysis. This feature identifies unprotected code that may unintentionally raise NullReferenceExceptions.

Null-reference exceptions are often thrown in unexpected, edge-case scenarios, and can easily remain undetected even after publishing your software. These code defects are challenging to find and are often discovered by customers after the application has shipped.

CodeRush for Roslyn now identifies code that may be prone to throwing a NullReferenceException. You can turn this feature on for C# (it is disabled by default) on the Editor | All Languages | Static Code Analysis options page:

NullRefSearch

Turn this feature on and let us know what you think.

Refactorings and Code Providers

We have added a new Add XML Comments code provider, which lets you instantly add new XML doc comments to members.

If you use Add XML Comments for a member that is an override or an interface implementation, the XML doc comment is based on the documentation found in the interface or ancestor class. If the target method has no base method or its base method or interface declaration has no XML comment, the code provider generates an empty XML comment with the correct structure.

Local Function Templates

Templates for creating methods are now available inside members in C# (for C# version 7 and above) to create local functions:

LocalFunctionTemplates

For more information on using templates to create methods and write code quickly, see the M for Methods video in the CodeRush Feature of the Week series.

ClickToWatch_0C42A107

Thanks For Your Support!

You can always download CodeRush for Roslyn from the Visual Studio Marketplace.

If you’re already using CodeRush for Roslyn and enjoying it, please share a review with other Visual Studio developers!

Blog Post: 20th Aniversary of BASTA! in Mainz, Germany

$
0
0

This week, John and I put up the booth at the 20th anniversary conference of BASTA! in Mainz, Germany.

image

Oliver has a fully booked workshop, and both of us will speak as well.

We will do our daily raffles where you could win a Bluetooth speaker, a drone or even a platform subscription of choice.

If you’re at BASTA!, come by and get your raffle ticket and tell us what you’re building with DevExpress!

Blog Post: Connect Dashboard to a Google Drive Spreadsheet

$
0
0

In this blog post, we share a sample project that connects Dashboard to a Google Drive spreadsheet. If you'd benefit from such a scenario, download the sample and use the instructions below to connect to your own data. And we’d love to see if you’re interested in such functionality to become native to our Dashboard: leave your comments and fill out the survey at the end.

Why a Sample Project, Not Built-In Support

If you consider SaaS Dashboard solutions, their list of supported sources typically includes cloud-based spreadsheets – those stored in Google Drive, Dropbox, or OneDrive. There’s a balance to that combination, with both the dashboard and its data being hosted by third parties in the cloud. That cloud-based mix of storage and UX lets you completely avoid building an app in its classic sense.

On the other hand, DevExpress Dashboard has been designed with focus on application development – where you are in control of how your data is handled and where you integrate your dashboard into an application that goes beyond the boundaries of data analysis alone. Thus far, Cloud-Stored Spreadsheet support never made it to the top of our TO-DO list. We do get questions about this every now and then, so we can start to learn about our customers’ tasks, and want to continue doing this. And as this blog post shows, our Dashboard is flexible enough to support those kinds of data sources, should the feature make the top spot during our next planning.

Meanwhile, we hope to help customers who want Google Drive spreadsheet access by providing them with this "starter" project.

What’s in the Project

The video below guides you through the user experience. You first sign into your Google Account, allow the application to view the files in your Google Drive, select the required spreadsheet file, then a sheet, table, or a named range within it. Once connection has been established, you build your dashboard as you’d do with any other data source type.

Download, Run, Modify

Start by downloading the project from the DevExpress Code Central:
https://www.devexpress.com/Support/Center/Example/Details/T549666

Right-click and set the MvcDashboard project in the solution as a StartUp Project and run the application. You can connect to your own Google spreadsheets and analyze their data by using the Web Dashboard.

In our version of the application, the authentication works through our test Google API Console project that allows data access from localhost. Consider the following authentication-related changes you'll want to make in a production app.

Obtain and Specify Your "Client ID"

To integrate Google Sign-In into your web application, follow the Google Sign-In for Websites guide, which results in generating your own “Client ID” and “Client Secret” values.

Once you've obtained the values, open Web.config in the MvcDashboard project and specify GoogleClientID and GoogleClientSecret within the <appSettings> section.

<configuration><!-- ... --><appSettings><!-- ... --><add key="GoogleClientID" value="ClientIDValue" /><add key="GoogleClientSecret" value="ClientSecretValue" /></appSettings><configuration>

Enable the Google Drive API

To interact with the Drive API, you need to enable the Drive API service for your app. The following guide describes how to do that:

https://developers.google.com/drive/v3/web/enable-sdk

Set Redirect URI

When you deploy the project to a web server, you'll need to use the Google Site Verification API to verify the authenticated user as the domain owner. Once that's done, the app can have Google Sign-in service redirect back to your web site. To launch the application on your domain / site, open Web.config in the MvcDashboard project. Then change the RedirectUri value within the <appSettings> section to your domain / site instead of localhost. Remember that our implementation requires the "/Home/GoogleRedirectCode" string to follow the production domain name to make sure that the correct action method is invoked.

<configuration><!-- ... --><appSettings><!-- ... --><add key="RedirectUri" value="https://www.mydomain.com/Home/GoogleRedirectCode" /></appSettings><configuration>

Your Thoughts about Using Dashboard with Cloud-Hosted Spreadsheets

Please take a moment of your time to indicate your preferred cloud-based spreadsheet provider for the DevExpress Dashboard. And if you’ve got more to say on the matter, do use the comments section below.

Blog Post: Use DevExtreme ASP.NET MVC Controls easily in ASP.NET Core 2.0

$
0
0

In August 2017 Microsoft released the ASP.NET Core 2.0 framework. This major update packs a lot of new features as their announcement blog post makes clear:

This release features compatibility with .NET Core 2.0, tooling support in Visual Studio 2017 version 15.3, and the new Razor Pages user-interface design paradigm. For a full list of updates... -Microsoft Announcement blog post

We've been working hard to provide compatibility with this new release and I'm happy to announce that our DevExtreme ASP.NET MVC controls now support ASP.NET Core 2.0.

To get ASP.NET Core 2.0 in Visual Studio 2017 15.3.x, please check this link: https://www.microsoft.com/net/core

To learn more details about ASP.NET Core 2.0, please see this detailed blog post:https://blogs.msdn.microsoft.com/webdev/2017/08/14/announcing-asp-net-core-2-0/

Get started

To get started with ASP.NET Core 2.0 and DevExtreme MVC Controls in just a few minutes, create an ASP.NET Core 2.0 project using VS2017 and then add DevExtreme MVC Controls resources to it using this guide (see "ASP.NET Core MVC" section):

DevExtreme ASP.NET MVC Controls: Download and Installation

In this screenshot of the Solution Explorer, you see the necessary DevExtreme packages and files that you'll need for ASP.NET Core 2.0:

Upgrade Existing Projects

To upgrade your existing ASP.NET Core 1.x application that is based on *.csproj and includes DevExtreme MVC Controls, you'll need to make the following changes:

  1. Change the "TargetFramework" in your *.csproj file:
<PropertyGroup><TargetFramework>netcoreapp2.0</TargetFramework></PropertyGroup>
  1. Replace "Microsoft.AspNetCore.*" packages with the new "Microsoft.AspNetCore.All" meta package:
<PackageReference Include="Microsoft.AspNetCore.All" Version="2.0.0" />

Your csproj file should look something like this:

Then run your upgraded project and the DevExtreme ASP.NET MVC Controls will work in ASP.NET Core 2.0:

Razor Pages

As part of ASP.NET Core 2.0, Microsoft also introduced 'Razor Pages', which makes page-focused scenarios easier and more productive:

Razor Pages allow you to code without the need for a controller, for example:

We tested the DevExtreme ASP.NET MVC Controls with the new Razor Pages feature and it works brilliantly. Here's the DevExtreme ASP.NET MVC DataGrid that's bound to a WebAPI web service in a Razor Page:

Are you using DevExtreme MVC Controls with ASP.NET Core 2.0? I'd love to hear about it, drop me a line below. Thanks!

Twitter: @mehulharry


Create highly responsive web apps for touch-enabled devices and traditional desktops.

From desktops to mobile devices, DevExtreme HTML5 Data Grid delivers the flexibility you’ll need to build apps that reach the widest audience and deliver touch-first user experiences to power your next great interactive website.

Download a free and fully-functional version of DevExtreme now: Download DevExtreme

Blog Post: XAF - Security permissions processing mechanism optimization and important changes (Coming soon in v17.2)

$
0
0

We have reworked XAF’s permission processing algorithm. It is now faster and ships with improved ways to extend existing permission functionality (thus simplifying code maintenance).

Find more technical details at https://www.devexpress.com/go/XAF_Try_Security_Optimizations_v17.2_September.aspx

If you are an active v17.1 subscriber and want to test this new permission processing engine with your real world applications on a virtual machine (or another suitable test environment) prior to the official release, please leave a comment to this KB article or create a separate private ticket, so that we can verify your account and provide you with the v17.2 preview installation privately.

Please report any issues and suggestions in the Support Center once you've had an opportunity to try this new feature in your upgraded v17.2 project. Thanks for your help in advance!


Announcement: Introducing Logify: 24/7 Application Monitoring Service

$
0
0
We are proud to announce the immediate availability of Logify, our 24/7 application monitoring and crash reporting service. Designed for small and large developer teams alike, Logify helps track runtime execution errors, recognize weaknesses within an app in real-time, and eliminate errors associated with traditional bug reporting processes.

Blog Post: New Bootstrap Controls for ASP.NET Core 2.0 (CTP release)! - Join the pre-release party

$
0
0

Earlier this year, we released the DevExpress ASP.NET Bootstrap controls for the ASP.NET WebForms framework. We developed these new set of innovative controls to provide a great experience when used within the Bootstrap framework. If you're not familiar with our Bootstrap controls, please take a look at these pastblogposts.

After releasing these new controls for WebForms, one of the biggest questions we got was, "What about ASP.NET Core and MVC?"

Well, I'm here to announce another great innovative web offering from DevExpress ...

ASP.NET Core...Cross platform

Version 2.0 of the new ASP.NET Core framework was recently released and I'm happy to announce our new set of controls specifically for this new framework: 'the DevExpress ASP.NET Bootstrap controls for ASP.NET Core 2.0'. That's the unofficial name for now.

These new controls have a new API and architecture that takes advantage of the ASP.NET Core framework. However, they do keep a similar set of features as the existing ASP.NET Bootstrap controls for WebForms.

The combination of ASP.NET Core framework and DevExpress Bootstrap controls means:

  1. Write modern web application using C# (or your favorite supported .NET language)
  2. Cross-platform support: Linux, MacOS, and Windows
  3. Use a wide set of Bootstrap themes (https://themes.getbootstrap.com/)
  4. Full support for MVC features: Data Annotation attributes, model binding, unobtrusive validation, and more.
  5. DevExpress elegance, power, ease, and features!

Help Test CTP Release

The first release of these controls is a CTP (community technology preview). It's available today and we'd love for you to test them in your ASP.NET Core 2.0 projects.

By testing the new controls and providing us feedback, you'll help us improve them before the final release.

Getting started

We've made the getting started experience easy using our NuGet server. Take a look at this step-by-step guide:

https://demos.devexpress.com/aspnetcore-bootstrap/GettingStarted

Then play around with the online demos:

Provide feedback

Once you've integrated them into your project, please provide us feedback via the excellent DevExpress Support Center.

What's included?

Nearly all 20+ of the existing DevExpress ASP.NET Bootstrap controls are available in this CTP release. This includes controls like the GridView, Navigation controls, Editors, and more. However, the FormLayout, UploadControl, and the Charts are not available yet.

Also check out these projects that help you to get started:

A GitHub starter project with necessary packages and references

A Docker image that contains the GitHub starter project running on Ubuntu!

The web is about choices...

Currently, we also offer another set of controls for the ASP.NET Core framework, the DevExtreme ASP.NET MVC Controls.

The main goal of the DevExpress ASP.NET Bootstrap Controls for ASP.NET Core is full compatibility with Bootstrap themes. If you plan to create a Bootstrap application then use the Bootstrap Controls whether for ASP.NET WebForms or ASP.NET Core.

The DevExtreme ASP.NET MVC Controls support ASP.NET MVC (3+) and ASP.NET Core (1.x and 2.0). Keep in mind that they're based on client-side JavaScript controls. If you are a JavaScript dev then you may prefer the 'DevExtreme ASP.NET MVC Controls'. If you are a .NET dev then you may prefer 'the DevExpress ASP.NET Bootstrap Controls for ASP.NET Core'.

What about ASP.NET MVC?

At this time, our new Bootstrap controls for ASP.NET Core 2.0 will not support previous versions of the ASP.NET MVC framework. That is not to say that they will never support those frameworks. We will keep an eye on your feedback and decide in the future.

Bootstrap 4 Beta

The Bootstrap team just announced the 'Bootstrap 4 beta' release.

Good news, we are supporting Bootstrap 4 for our new Bootstrap controls for ASP.NET Core 2.0 out of the box.

Join the webinar

On Tuesday, October 24th, 2017 at 10am, I'll show you how to get started with the new DevExpress ASP.NET Bootstrap Controls for ASP.NET Core 2.0. You'll learn about the NuGet package(s), boilerplate project, changing Bootstrap themes, and features of the controls. We'll also cover ASP.NET Core features such as Model Binding, Data Annotations, and Unobtrusive Validation.

Sign up for the live webinar here: New Bootstrap Controls for ASP.NET Core 2.0

What do you think of the CTP release of the DevExpress Bootstrap Controls for ASP.NET Core 2.0? Drop me a line below.

Thanks!


Your Next Great .NET App Starts Here

Year after year, .NET developers such as yourself consistently vote DevExpress products #1.

Experience the DevExpress difference for yourself and download a free 30-day trial of all our products today: DevExpress.com/trial (free support is included during your evaluation).


Blog Post: New Funnel Chart Widget (Coming soon in v17.2)

$
0
0

A Funnel Chart is a type of chart often used to visualize a value at different stages of a process and to assess value changes throughout those stages. Funnels are useful to identify potential issues in processes.

A typical funnel report represents stages of a process in the form of upturned trapezoids. The longer and shorter bases of the trapezoids represent the value at the start and end the given stage, respectively. Although the funnel chart is named after the household funnel, the resemblance is superficial. Unlike a real funnel, not everything that is “poured in” at the top of a funnel chart flows through to the bottom.

An Example Use Case

For this post, we focus on using a funnel chart to analyze a conversion rate and identify bottlenecks. This type of report is usually called Conversion Funnel or Sales Funnel.

The conversion rate is one of the most important aspects of paid inclusion campaigns. The conversion rate of a website, for example, can show what percentage of all visitors performed a desired action: bought a product, filled out a form, etc. The bigger the conversion rate, the more successful is the website and a related paid inclusion campaign.

One way of raising the conversion rate is getting rid of bottlenecks. A bottleneck is one process in a chain of processes whose limited throughput reduces the throughput of the entire chain. Simply put, it’s a point where the measured value drops by the largest margin. We created a sample funnel chart to illustrate the concepts of conversion rate and bottleneck. We used the jQuery Funnel widget, a data visualization component new to DevExtreme in the upcoming v.17.2 release. Note that as usual the component is also available as an Angular Component, ASP.NET MVC and ASP.NET Core MVC Controls and a Knockout binding.

Conversion Rate Funnel Chart

As you can see, 18% of the website visitors renewed their subscriptions, so this is the conversion rate of the website. But most of the visitors decided not to subscribe after contacting support. This bottleneck is made obvious by the funnel chart, and it might be possible to improve things, for example, by providing some extra training for the support team.

Why a New Widget?

DevExtreme subscribers are familiar with our impressive library of data visualization components. Specifically, there is the feature-rich Chart widget with its many series types. We considered implementing the Funnel chart as a new series type for the Chart widget, but we decided to introduce it as a separate component, because the Cartesian XY coordinate system used by the Chart is not a good fit for the Funnel.

However, Funnel and Chart share many visual elements like the legend, the title, tooltips and color schemes, and most importantly they share the simplicity of configuration. For example, the following code is sufficient to create a Funnel with default styling:

$("#funnel").dxFunnel({
  dataSource: [
    { argument: "Visited the Website", value: 9152 },
    { argument: "Downloaded a Trial", value: 6879 },
    { argument: "Contacted Support", value: 5121 },
    { argument: "Subscribed", value: 2224 },
    { argument: "Renewed", value: 1670 }
  ],
  title: "Website Conversions",
  argumentField: "argument",
  valueField: "value"
});

Try It Now!

The Funnel widget is included in the v17.2 pre-release that is available via npm right now. Please note that this pre-release may contain some bugs and is not intended to be used in production.

npm install devextreme@17.2.1-pre-17262

We will provide full documentation when v17.2 is released, meanwhile you can learn more about Funnel configuration from this PR on GitHub.

If you have thoughts about this new DevExtreme widget, please share them with us!

Blog Post: DevExtreme ASP.NET MVC Controls – Improvements & New Features in Data Sources (coming soon in v17.2)

$
0
0

The DevExtreme ASP.NET MVC Controls provide a powerful data layer to help you read and write data with our controls. The data layer is invisible but serves an important role for your apps. In fact, we've got a great documentation data layer topic that I recommend reading:

In this blog post, I'll highlight the changes coming to the DevExtreme data layer in the upcoming v17.2 release. We're introducing a set of changes and improvements that are primarily driven by customer feedback.

New behavior of Url generation of .Mvc() and .WebApi() data sources

In the v17.1.5 release, I talked in detail about the change to our DataSource URL generation. Please take a look at this blog post that describes our motivation and the changes: DevExtreme ASP.NET MVC Controls: DataSource URL Improvements (17.1.5).

Since August 2017, many customers have shared projects and code with our support team and it's good to see that many have enabled the new mode and are happy with it.

Warning: In the v17.2 release, we're changing the default value of the flag controlling that behavior (UseLegacyRouting) to false. Meaning, we don't want to use legacy routing but the new and improved approach. However...

This could BREAK your existing projects. This potential breaking change can be avoided. However, I recommend that you test your existing projects as we've seen good feedback from many customers. You can test this change using the new flag now by downloading v17.1.5+ release, which is available now.

If you're not ready for the change when v17.2 is released then simply set the UseLegacyRouting to true:

For ASP.NET MVC 5 applications, in Global.asax.cs:

protected void Application_Start()
{
  DevExtreme.AspNet.Mvc.Compatibility.DataSource.UseLegacyRouting = true;
  // ... the rest of your code ...
}

For .NET Core apps, in Startup.cs:

public void Configure(IApplicationBuilder app,
                      IHostingEnvironment env,
                      ILoggerFactory loggerFactory)
{
  DevExtreme.AspNet.Mvc.Compatibility.DataSource.UseLegacyRouting = true;
  // ... the rest of your code ...
}

In v17.2, all DevExtreme demos and project templates have been updated to use the new routing mode. This, you'll find, works more predictably and in accordance with the standard MVC @Url.Action and @Url.RouteUrl constructs.

Support for Areas

Areas are an ASP.NET MVC feature used to organize related functionality into a group as a separate namespace (for routing) and folder structure (for views). Using areas creates a hierarchy for the purpose of routing by ... Areas provide a way to partition a large ASP.NET Core MVC Web app into smaller functional groupings. - Microsoft Documentation

Also in v17.2, we've added support for 'areas'. So both the .Mvc() and .WebApi()data sources now provide the .Area() configuration option in addition to .Controller() and .Action(). This means that you can now reference API controllers in different areas.

RemoteController: consume API controllers from a different domain/host

If API controllers were located on another domain, it was problematic to use them. Customers had to use JavaScript instead of strongly-typed Razor syntax.

In 17.2 we improve this by introducing a new kind of data source: RemoteController. Basically it is the same as .Mvc() or .WebApi() but instead of specifying routing options (controller, action, etc), you specify direct Urls pointing to anywhere on the web.

Here's an example:

@(Html.DevExtreme().DataGrid()
    .DataSource(ds => ds.RemoteController()
        .Key("OrderID")
        .LoadUrl("http://www.example.com/Orders/Get")
        .InsertUrl("http://www.example.com/Orders/Insert")
        .UpdateUrl("http://www.example.com/Orders/Update")
        .DeleteUrl("http://www.example.com/Orders/Delete")
    )
)

Updated DevExtreme.AspNet.Data library with new features

DevExtreme.AspNet.Data, the open-source library used by DevExtreme ASP.NET MVC Controls for data access has been updated to version 1.3 with a number of enhancements:

  • Support for server-side "select" operation (PR #125)
  • Published LoadResult and Group classes (PR #130)

What do you think about the DevExtreme ASP.NET MVC Controls? Drop me a line below.

Email: mharry@devexpress.com

Twitter: @mehulharry


Create highly responsive web apps for touch-enabled devices and traditional desktops.

From desktops to mobile devices, DevExtreme HTML5 Data Grid delivers the flexibility you’ll need to build apps that reach the widest audience and deliver touch-first user experiences to power your next great interactive website.

Download a free and fully-functional version of DevExtreme now: Download DevExtreme

Blog Post: HTML5 JavaScript DataGrid and PivotGrid Enhancements (v17.2)

$
0
0

The DevExtreme DataGrid and PivotGrid widgets are getting enhancements for you and your end-users. In the v17.2 release we're adding UI features that help you when working with data in our grids:

Built-in Search in Header Filter

The Header Filter is a great way to filter the data in the grid because it gives you all the unique values of the column. However, if there are many distinct values, it can be annoying to scroll through the list trying to find a particular value.

In the next 17.2 release, we've added a search text box that allows to filter data inside the dxDataGrid and dxPivotGrid's header filters. This gif shows the new feature in action:

DevExtreme Grid Header Filter

You can still control whether searching is enabled in the header filter using the dxDataGrid.headerFilter.allowSearch and dxPivotGrid.headerFilter.allowSearch options.

Built-in Search in Column/Field Chooser

We've also added the search functionality to the dxDataGrid's column and dxPivotGrid's field chooser:

DevExtreme Grid Field Chooser

Customize these features through the dxDataGrid.columnChooser.allowSearch and dxPivotGrid.fieldChooser.allowSearch options.

Built-in Date-Time Filter for dxDataGrid

The dxDataGrid’s DateTime columns can be now filtered using the date and time:

DevExtreme Grid Date-Time Filter

Additional minor improvements

  • The validationCallback function now provides access to the current dxDataGrid row data via the data parameter when a Custom validation rule is used  
  • The dxPivotGrid field’s sortBy option can now accept the none value to disable local sorting

Angular, ASP.NET MVC/Core, & More!

Note that all these new features are available in the DataGrid and PivotGrid Angular components, ASP.NET MVC and .NET Core controls, and jQuery widgets too.

Try it now

The new features of our dxDataGrid and dxPivotGrid widgets are included in the v17.2 pre-release that is available via npm right now. Please note that this pre-release may contain some bugs and is not intended to be used in production:

npm install devextreme@17.2.1-pre-17273

Learn more about DevExtreme's pre-releases in this blog post.


What do you think about the grid improvements in the next release? Drop me a line below.

Email: mharry@devexpress.com

Twitter: @mehulharry

Blog Post: CodeRush 17.1.9 is Now Available

$
0
0

CodeRush 17.1.9 is now available, adding support for source code & XAML formatting, Microsoft Fakes support, and we have improved the unused member de-emphasis experience.

Code Formatting

The Code Formatting feature now includes new (beta) abilities to configure Line Breaks. Two new options pages have been added:

Editor | C# | Formatting | Blank Lines — enables you to configure the number of blank lines around and within the following code elements:

  • Namespaces
  • Types
  • Methods
  • Properties
  • Fields

Editor | C# | Formatting | Braces — enables you to configure the line breaks around and within the following code blocks:

  • Namespaces
  • Types
  • Methods
  • Properties
  • Accessors
  • Lambda Expressions and Anonymous Methods
  • Statements


Code Formatting styles are applied using the Code Cleanup feature.

XAML Formatting

We have added an ability to normalize whitespace inside XML comments.

XAML_Whitespace

Unit Testing

  • CodeRush Test Runner now supports the Microsoft Fakes isolation framework.

    It helps you mock the code you are testing by replacing parts of your application with the small pieces of code under the control of your tests.


    Note: Microsoft Fakes framework is available only in the Enterprise version of Visual Studio.

  • The Code Coverage filtering has been improved. You can now filter the report, not only by name and percentage, but also by node kind.

    For example, you can create a filter that only shows methods with test coverage between 1% and 40%, like this:

    CoderageFilter

Code Analysis

We have improved the Highlight Unused Members experience so that member de-emphasis is temporarily disabled when the caret is inside the member.

Thanks For Your Support!

You can always download CodeRush for Roslyn from the Visual Studio Marketplace.

If you’re already using CodeRush for Roslyn and enjoying it, please share a review with other Visual Studio developers!

Blog Post: React Data Grid for Google Material Design

$
0
0

Material-UI (the Material Design React component library) version 1.0 is about to release, and so is our DevExtreme React Grid v1.0 (at the same time as DevExtreme v17.2). The very first pull request that started our work on Material UI integration was merged four months ago. Since then, our Material UI data grid has caught up to its Bootstrap counterpart. In this post I’d like to sum up what has been done to support the Google Material Design Data Table in the DevExtreme React Grid.

React Grid Material UI

Editing UI

Editing is one of the most demanded features of any data grid. It allows users to create, update and delete rows right in the visual data table. To provide this functionality, the React Grid renders specific editing controls if the editing-related plugins are used. You can customize the appearance of editing controls. For instance, you can specify the text and icons you want to see in your application, or provide custom value editors for certain columns.

Read our React Grid docs about editing (they apply for Bootstrap and Material UI)

Editing UI

Filtering UI

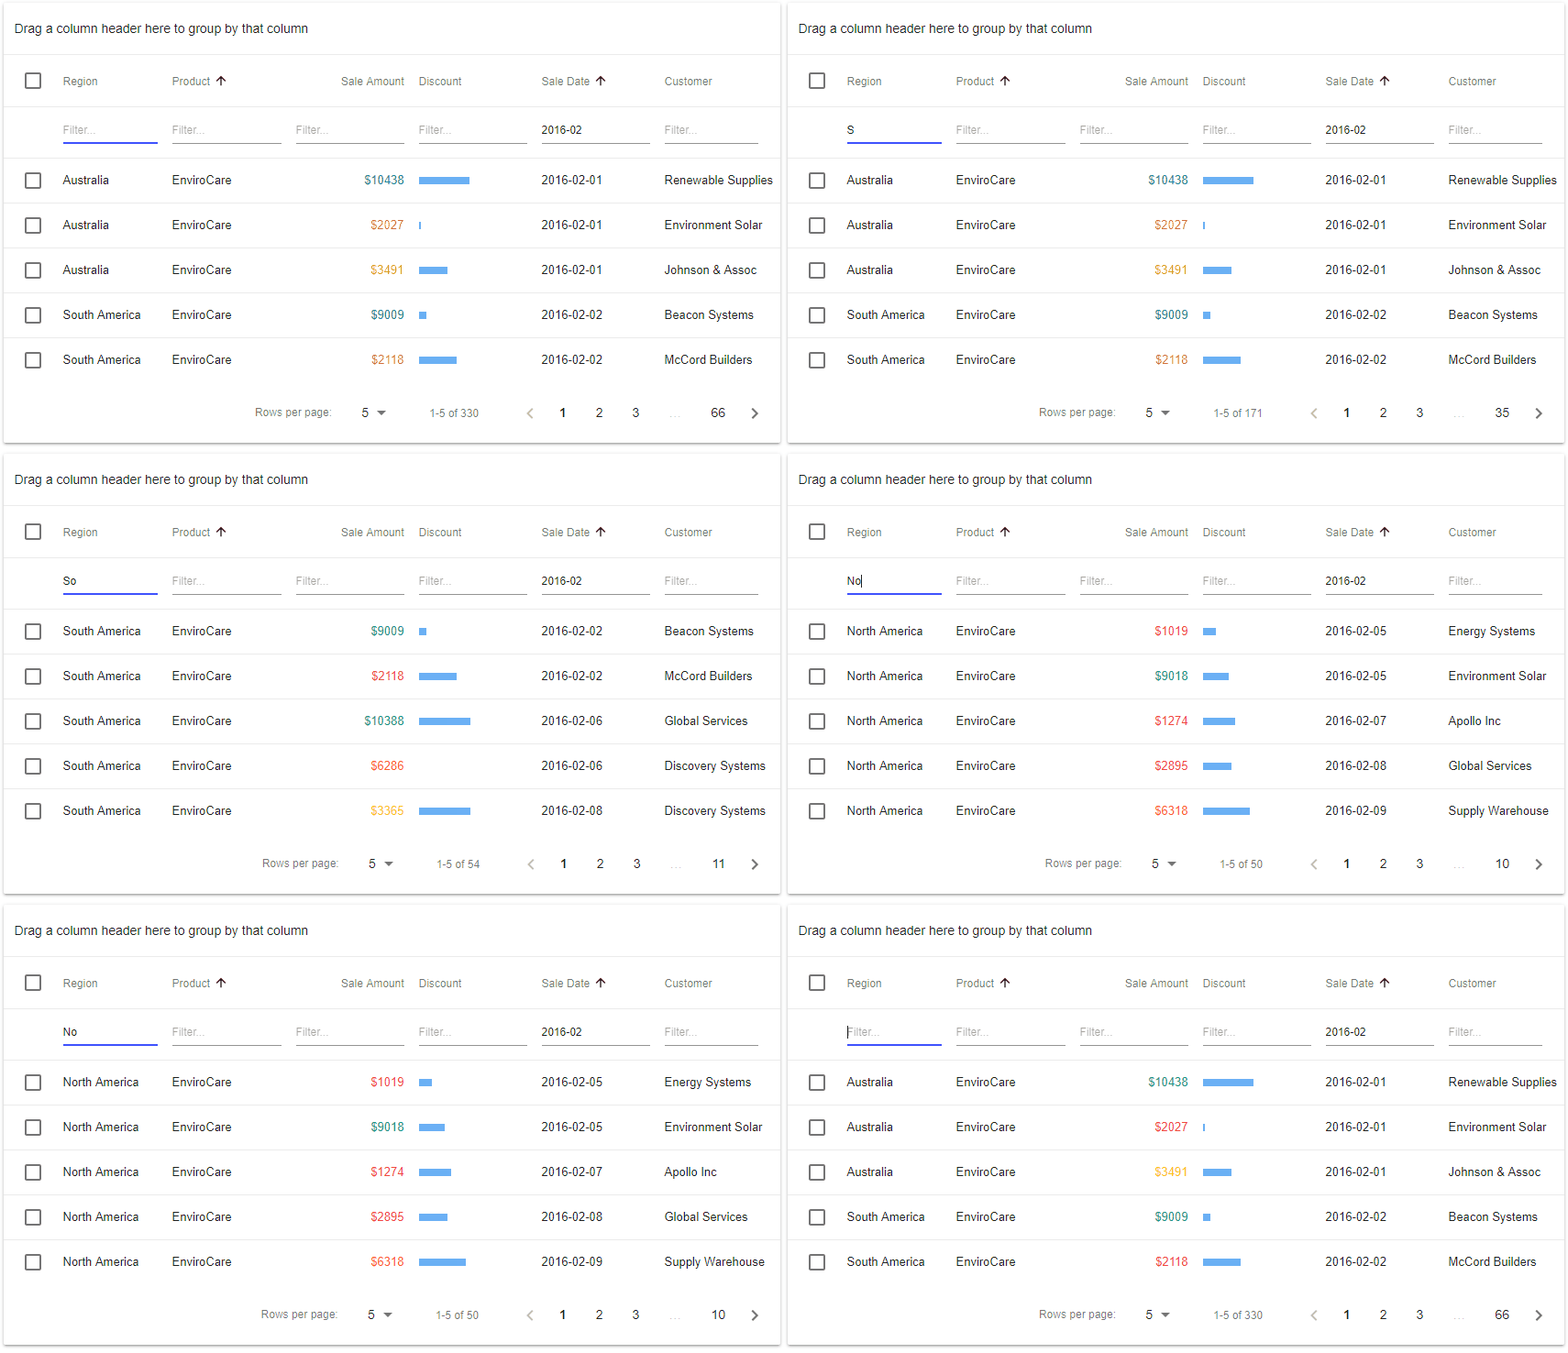
A typical real-world LOB application visualizes and manages a lot of data. Search capabilities are crucial to the end-user experience. Our Material UI data grid has a set of plugins that implement filtering functionality, such as the Filter Row, special row shown right underneath the table header, containing filter editors used to enter filter values.

Read our React Grid docs about filtering (they apply for Bootstrap and Material UI)

Filtering UI

Grouping UI

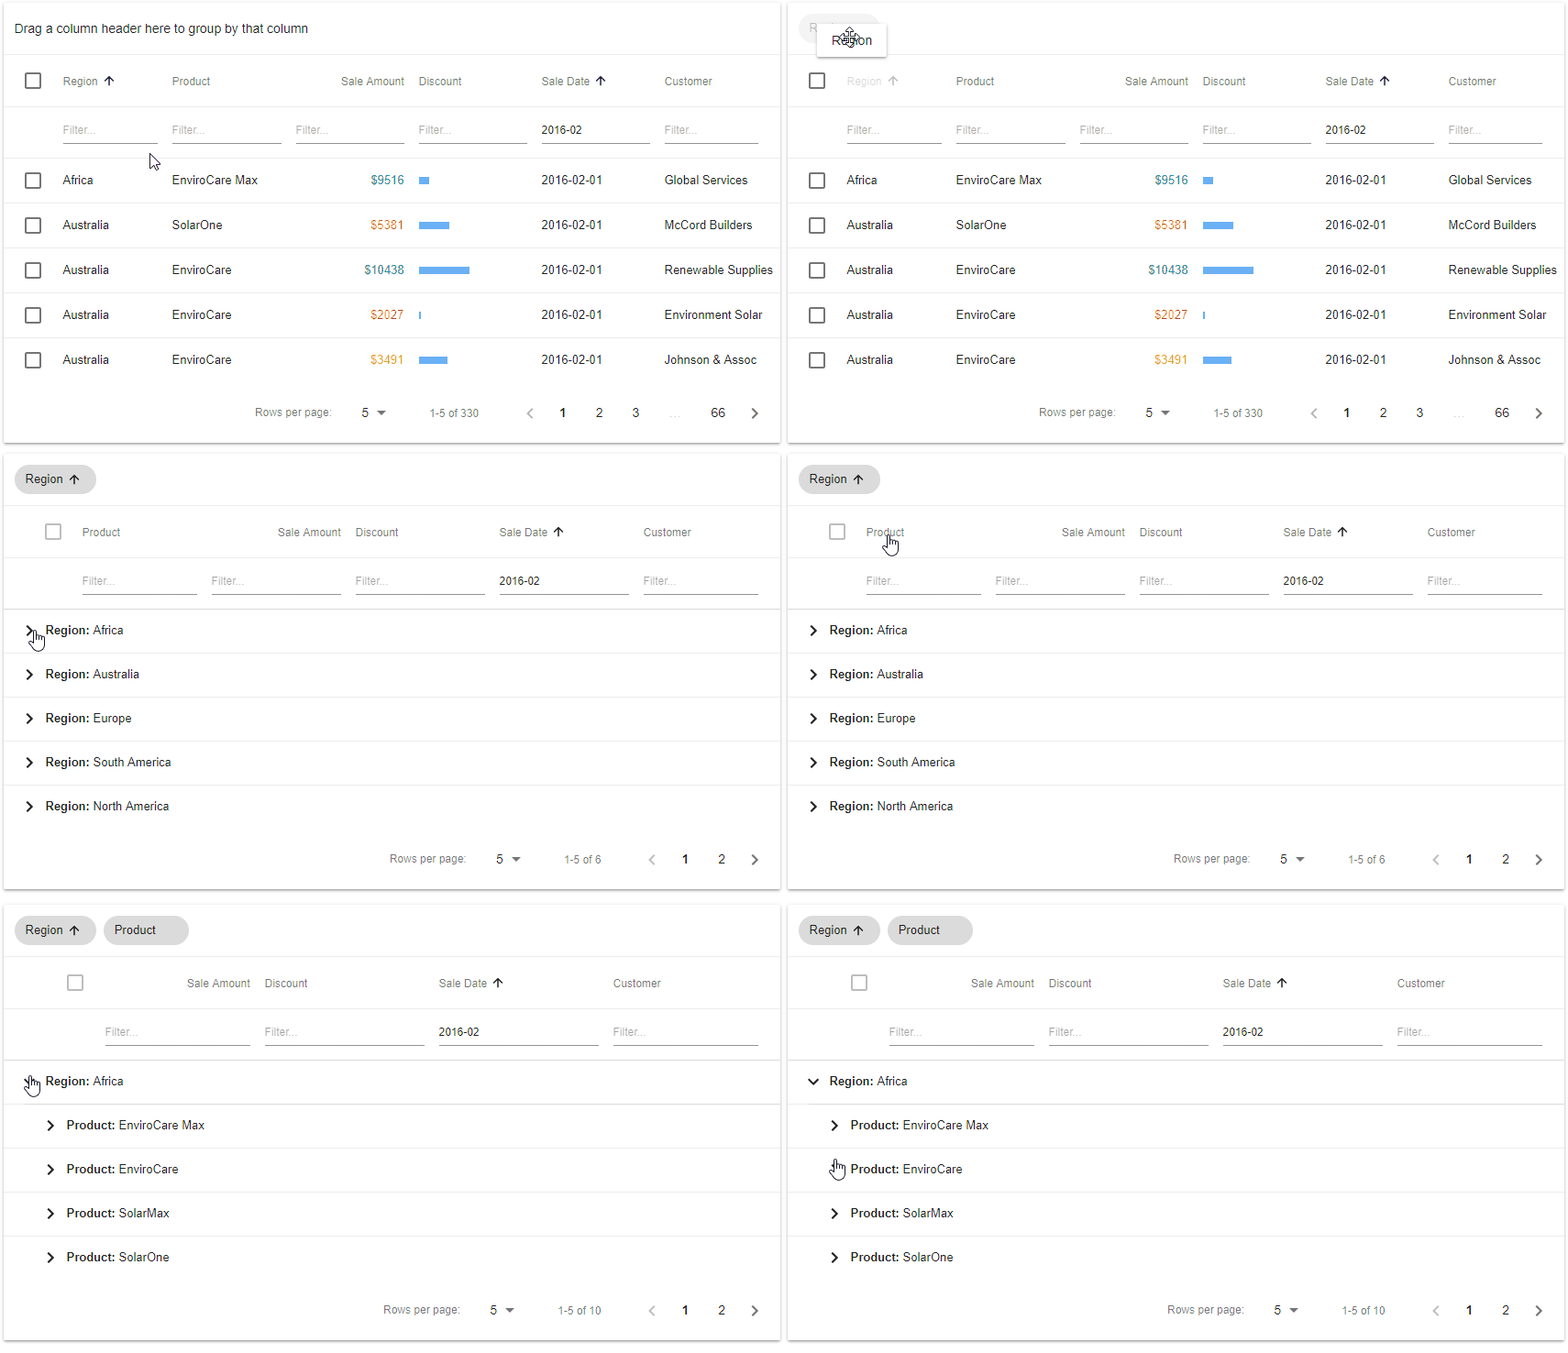
Another technique that simplifies work with large amount of data is to group information by criteria. End users can browse grouped rows and expand or collapse them as needed. The Google Material Design guidelines don’t contain specifications for a data table grouping UI. We did our best to provide UI for this feature that would be consistent with the guideline intentions. Multi-level grouping by several columns or custom values is also available.

Read our React Grid docs about grouping (they apply for Bootstrap and Material UI)

Grouping UI

Paging UI

Row paging is a must-have common feature that is expected by almost every data grid user. As you would expect, the Google Material Design guidelines contain specifications for this feature and we observe them in our Material UI Data Grid for React. The Grid provides controls to change page size, switch the current page and to display the number of available pages as well as the range of visible rows. Paging is integrated with the Grouping feature, so the Grid shows the current page group header on each page, if grouping is configured.

Read our React Grid docs about paging (they apply for Bootstrap and Material UI)

Paging UI

Selection UI

In web applications that allow data manipulation, you usually need row selection capabilities. An end-user might want to delete rows or perform batch updates, for which rows need to be selectable. Selections can incorporate individual rows, all rows on the current page, or all rows loaded in the Grid. The appearance of row selection in data tables is specified in the Material Design guidelines and we have implemented it for the DevExtreme React Grid accordingly.

Read our React Grid docs about selection (they apply for Bootstrap and Material UI)

Selection UI

Row Detail UI

When your data row is represented as a complex structure, the Detail Row feature can be very helpful. It allows the Grid to display many rows in a compact view when collapsed, but end users can expand individual rows as required to display row details. You can also implement master/detail scenarios using the Detail Row feature.

Read our React Grid docs about row details (they apply for Bootstrap and Material UI)

Row Details UI

Light, Dark and Custom Material Design Themes

There are two standard Material Design themes: Light and Dark. They are both supported by the React Data Grid for Material UI. If you don’t like these standard themes you can configure your own, for instance to reflect the colors of your company branding.

See our React Grid theming demos (switch to Material UI)

Dark Material Design Theme

Lots of other features

In time for our final release we expect all other React Grid features supported by the Bootstrap Grid to be available for Material Design as well. Sorting, column reordering, column resizing, the column chooser and others are available now, while virtual scrolling for Material UI will be implemented soon.

Other features

Feel free to download your copy from npm and let us know what you think!

Viewing all 3388 articles
Browse latest View live